
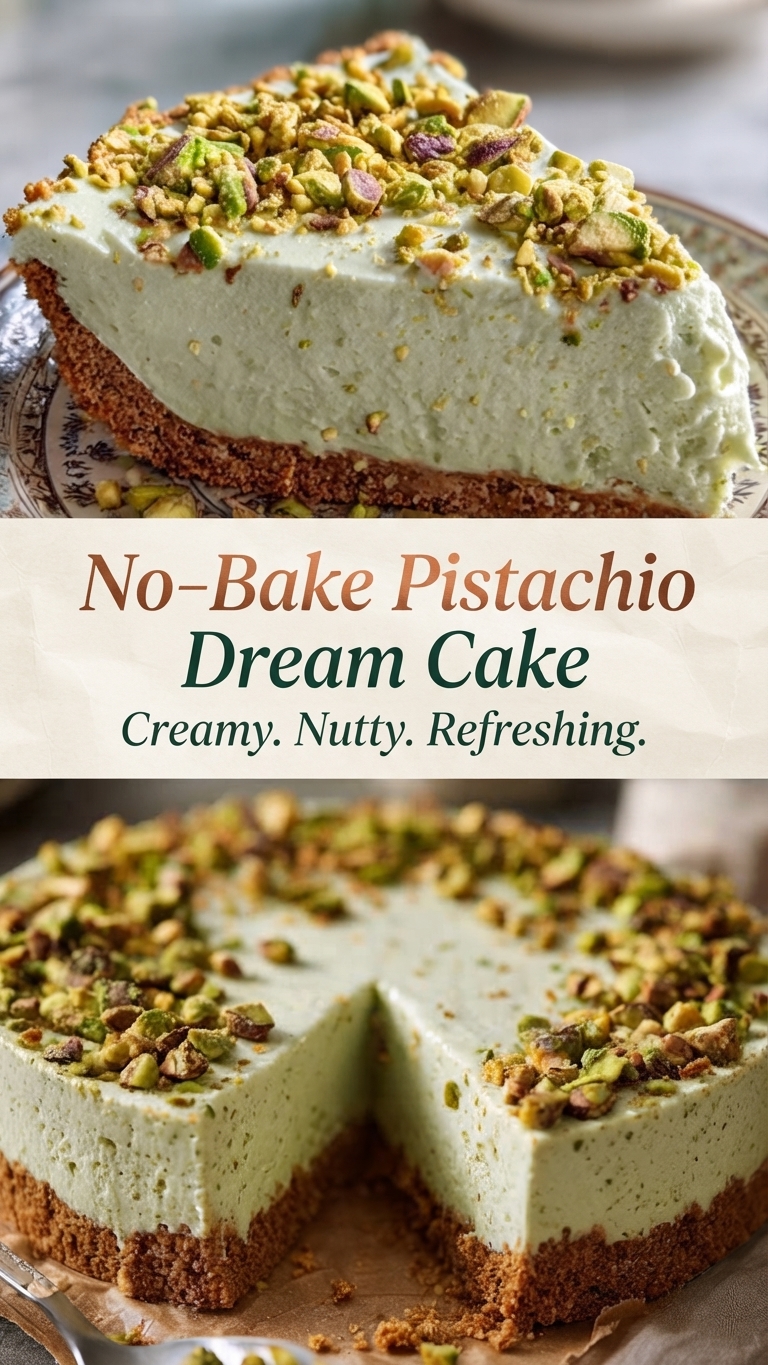
No-Bake Pistachio Cheesecake
Welcome to the ultimate dessert for pistachio lovers. This No-Bake Pistachio Cheesecake is not only stunningly vibrant but also incredibly simple to make. Say goodbye to cracked tops and water baths; this recipe relies on the refrigerator to set up a perfectly creamy, nutty, and dreamy filling.
Featuring a crisp graham cracker crust and a luscious, cloud-like pistachio cream cheese layer, it’s a refreshing and elegant treat for any occasion. The combination of salty, crunchy pistachios with the sweet and tangy cheesecake filling is pure perfection. Whether you’re hosting a dinner party or just craving a sophisticated sweet, this recipe delivers every time.
Why You’ll Love This Recipe:
-
No-Bake Convenience: No oven required, making it perfect for warm weather or when you need a make-ahead dessert.
-
Stunning Color: The natural, subtle green hue comes from the pistachios themselves (or a tiny drop of food color, if you prefer a bolder shade).
-
Exceptional Texture: It’s incredibly creamy, yet firm enough to slice beautifully.
-
Nutty Flavor: Each bite is packed with the rich, buttery taste of pistachios.
Ingredients
To create this masterpiece, you will need the following ingredients.
For the Crust:
-
Graham Cracker Crumbs: About 1 ½ cups (or 12-14 full sheets) of finely crushed graham crackers.
-
Unsalted Butter: ½ cup (1 stick), melted.
-
Sugar: 2 tablespoons of granulated sugar to bind and sweeten the crust.
-
Salt: A small pinch (about ¼ teaspoon) to balance the sweetness.
For the Pistachio Filling:
-
Cream Cheese: Two 8-ounce (226g) blocks, softened to room temperature. This is crucial for a smooth filling.
-
Pistachio Butter: ½ cup (about 125g) of high-quality, unsweetened pistachio butter. Look for one that is just ground pistachios.
-
Heavy Whipping Cream: 1 cup (240ml), very cold.
-
Powdered Sugar (Confectioners’ Sugar): ¾ cup, sifted to remove lumps.
-
Vanilla Extract: 1 teaspoon.
-
Pistachio Extract (Optional): ¼ teaspoon, for an intensified pistachio flavor.
-
Salt: ¼ teaspoon.
-
Optional Green Food Coloring: 1-2 drops of green gel food coloring for a vibrant hue (optional, as the pistachio butter provides a natural, light green color).
For the Topping:
-
Roasted, Unsalted Pistachios: ½ cup, coarsely chopped.
-
Whipped Cream: (Optional, for serving).
Instructions
Follow these step-by-step instructions to create your no-bake pistachio cheesecake.
Step 1: Prepare the Crust
-
Crush the Crackers: Place the graham crackers in a food processor and pulse until they form fine crumbs. Alternatively, place them in a sealed plastic bag and crush them with a rolling pin.
-
Mix Dry Ingredients: In a medium bowl, combine the graham cracker crumbs, sugar, and pinch of salt.
-
Add Butter: Pour in the melted butter and stir with a fork until all the crumbs are moistened and resemble wet sand.
-
Press into Pan: Firmly press the mixture into the bottom and slightly up the sides of a 9-inch springform pan. Use the bottom of a flat-bottomed glass or measuring cup to pack it tightly.
-
Chill: Place the crust in the freezer for at least 15 minutes while you prepare the filling, or in the refrigerator for 30 minutes.
Step 2: Make the Pistachio Filling
-
Whip the Cream: In a large, chilled bowl, use a hand mixer or stand mixer with a whisk attachment to beat the cold heavy whipping cream until stiff peaks form. Be careful not to over-beat. Set aside in the refrigerator.
-
Cream the Cheese: In a separate, large bowl, beat the softened cream cheese and powdered sugar together on medium-high speed until completely smooth and creamy, scraping down the sides as needed (about 2-3 minutes).
-
Incorporate Flavors: Add the pistachio butter, vanilla extract, pistachio extract (if using), salt, and food coloring (if using). Mix on medium speed until fully combined and the color is uniform.
-
Combine: Gently fold the whipped cream into the pistachio cream cheese mixture in three separate additions. Use a large rubber spatula to gently fold until no streaks remain, being careful not to deflate the whipped cream. This folding action is key to the light, airy texture.
Step 3: Assemble and Chill
-
Fill the Pan: Pour the pistachio filling evenly over the prepared chilled crust. Smooth the top with a spatula.
-
Cover: Cover the pan loosely with plastic wrap.
-
Refrigerate: Place the cheesecake in the refrigerator and chill for at least 6 hours, or preferably overnight, to allow it to set completely. The longer it chills, the firmer and better it will slice.
Step 4: Serve
-
Garnish: Just before serving, remove the cheesecake from the refrigerator. Carefully run a thin knife around the edges before unlatching the springform pan. Remove the outer ring.
-
Add Topping: Sprinkle the coarsely chopped roasted pistachios generously over the top of the cheesecake.
-
Slice and Enjoy: Use a sharp, hot knife (dip it in hot water and wipe dry between cuts) to slice the cheesecake cleanly. Serve chilled, perhaps with an extra dollop of whipped cream on the side.
Tips for Success
-
Room Temperature Cream Cheese: Ensure your cream cheese is truly at room temperature to prevent lumps. If you forget to set it out, you can microwave it for 15-20 seconds in a burst, but be careful not to melt it.
-
Use Pistachio Butter, Not Paste: Be sure to use pure, unsweetened pistachio butter (ground pistachios). Pistachio paste is sweetened and often contains almond meal, which will alter the flavor and texture.
-
Don’t Skip the Chill: The long chill time is essential for the filling to set properly. Don’t try to rush it, or your cheesecake may be too soft to slice.
-
Whip Cream Cold: Always use cold heavy whipping cream. For best results, chill your mixing bowl and beaters in the freezer for 10 minutes before whipping.
-
Get a Clean Slice: For bakery-quality slices, heat your knife under hot water, wipe it dry, and make a cut. Repeat for every slice.
Storage and Freezing
-
Storage: Cover leftover cheesecake tightly with plastic wrap or place it in an airtight container in the refrigerator. It will keep well for up to 5 days.
-
Freezing: This cheesecake freezes beautifully. You can freeze the whole cake or individual slices.
-
To Freeze Whole: Place the chilled cheesecake (without toppings) in the freezer for 1-2 hours until firm. Then, wrap it tightly in plastic wrap and then aluminum foil. It can be frozen for up to 2 months. Thaw overnight in the refrigerator before serving. Add fresh toppings just before serving.
-
To Freeze Slices: Wrap individual slices in plastic wrap and foil and freeze. Thaw in the refrigerator for a few hours or at room temperature for 30 minutes.
-
Serving Suggestions
This No-Bake Pistachio Cheesecake is elegant enough to stand alone, but you can elevate it with these simple additions:
-
Fresh Berries: A side of fresh raspberries or strawberries cuts through the richness and adds a beautiful color contrast.
-
Raspberry Coulis: A simple homemade raspberry sauce drizzled over the slices adds a lovely tartness.
-
Chocolate Drizzle: A light drizzle of melted dark chocolate complements the nutty flavor perfectly.
Conclusion
You are now ready to create a dessert that looks like it came from a high-end pâtisserie but is wonderfully easy to make at home. This No-Bake Pistachio Cheesecake is the ultimate balance of creamy, nutty, and dreamy. Enjoy every last decadent bite!