There’s something incredibly comforting and nostalgic about the aroma of apple pie baking. It conjures images of cozy kitchens, family gatherings, and the simple joy of a perfectly balanced sweet treat. But what if you could capture all that magic in a delightful, bite-sized package? Enter the mini apple tart – a charming, individual dessert that offers all the flavor of its larger counterpart with an added touch of elegance and convenience.
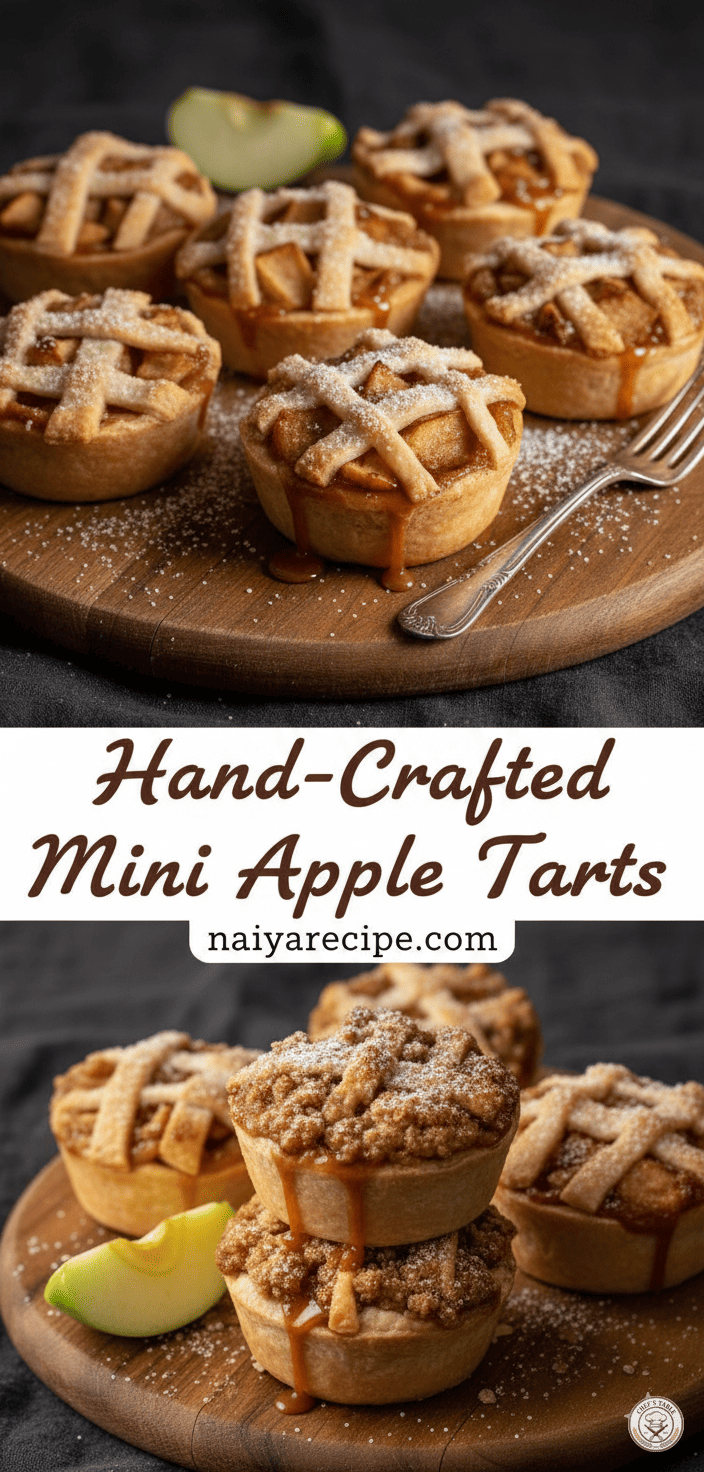
These hand-crafted mini apple tarts are more than just a dessert; they’re an experience. Perfect for entertaining, a sweet snack, or a delightful finish to any meal, they strike a beautiful balance between a tender, buttery crust and a warm, spiced apple filling. And let’s not forget the delightful toppings – from classic lattice work to a crumbly streusel, each bite is a little journey of texture and taste.
The Allure of the Mini Tart
Why choose mini tarts over a traditional pie? The appeal is multi-faceted:
- Portion Control: Each tart is a perfect single serving, making it easy to manage portions and ideal for individual enjoyment.
- Presentation: They are undeniably charming and visually appealing. Arranged on a platter, they make a stunning display that will impress any guest.
- Ease of Serving: No need for slicing and struggling with a messy pie. Simply pick up a tart and enjoy!
- Versatility: You can offer different toppings or slight variations in filling, catering to diverse preferences without baking multiple full-sized pies.
- Faster Baking Time: Smaller desserts generally bake quicker, meaning you can satisfy those apple tart cravings sooner.
The Foundation: A Flaky, Tender Crust
A great apple tart starts with a phenomenal crust. For these mini tarts, we’re aiming for a crust that is both tender and flaky, providing the perfect counterpoint to the soft apple filling.
Ingredients for the Crust:
- 2 ½ cups all-purpose flour
- 1 teaspoon salt
- 1 cup (2 sticks) unsalted butter, very cold and cut into small cubes
- ½ cup ice water (or slightly more, if needed)
Instructions for the Crust:
- Combine Dry Ingredients: In a large bowl, whisk together the flour and salt.
- Cut in the Butter: Add the cold butter cubes to the flour mixture. Using a pastry blender, two knives, or your fingertips, cut the butter into the flour until the mixture resembles coarse meal with some pea-sized pieces of butter remaining. The key here is to work quickly to prevent the butter from melting.
- Add Ice Water: Gradually add the ice water, one tablespoon at a time, mixing gently until the dough just comes together. Be careful not to overmix; overmixing develops gluten, leading to a tough crust.
- Form and Chill: Divide the dough into two equal discs, flatten slightly, wrap them in plastic wrap, and refrigerate for at least 30 minutes, or up to 2 days. Chilling the dough is crucial for a flaky crust, as it allows the gluten to relax and the butter to firm up.
The Heart: A Spiced Apple Filling
The filling is where the magic truly happens. We want a balance of sweet, tart, and warm spices that complement the apples without overpowering them.
Ingredients for the Apple Filling:
- 4-5 medium-sized apples (such as Granny Smith, Honeycrisp, or Fuji), peeled, cored, and finely diced
- ¼ cup granulated sugar (adjust to your apple’s sweetness)
- 2 tablespoons light brown sugar, packed
- 1 teaspoon ground cinnamon
- ¼ teaspoon ground nutmeg
- ⅛ teaspoon ground cloves (optional, but lovely)
- 1 tablespoon all-purpose flour or cornstarch (to thicken)
- 1 tablespoon fresh lemon juice
Instructions for the Filling:
- Prepare Apples: Peel, core, and finely dice your apples. Placing them in a bowl with the lemon juice immediately after dicing will prevent browning.
- Combine Ingredients: In a large bowl, combine the diced apples with granulated sugar, brown sugar, cinnamon, nutmeg, cloves (if using), and flour (or cornstarch). Toss gently to ensure all apple pieces are evenly coated.
The Toppings: Lattice and Streusel
Here’s where you can add your personal touch! We’ll cover two popular and delicious options: a classic lattice top and a crumbly streusel.
Option 1: Classic Lattice Top
A lattice top is elegant and allows the apple filling to peek through.
For the Lattice:
- Use one of your chilled pie dough discs.
- Roll it out thinly on a lightly floured surface into a rectangle.
- Using a pastry wheel or a sharp knife, cut strips about ½ inch wide.
- Weave these strips over the filled tarts to create a lattice pattern. Trim excess dough and press to seal the edges.
Option 2: Crumbly Streusel Topping
For those who love a bit of crunchy texture, a streusel topping is irresistible.
Ingredients for the Streusel:
- ½ cup all-purpose flour
- ¼ cup light brown sugar, packed
- ¼ teaspoon ground cinnamon
- 4 tablespoons (½ stick) unsalted butter, cold and cut into small pieces
Instructions for the Streusel:
- Combine Dry Ingredients: In a small bowl, whisk together the flour, brown sugar, and cinnamon.
- Cut in Butter: Add the cold butter pieces. Using your fingertips or a pastry blender, work the butter into the dry ingredients until coarse crumbs form.
- Chill: Refrigerate the streusel while you prepare the tarts.
Assembling Your Mini Apple Tarts
Now for the fun part – bringing it all together! You’ll need a standard 12-cup muffin tin.
- Preheat Oven: Preheat your oven to 375°F (190°C).
- Prepare Dough: On a lightly floured surface, roll out one disc of chilled pie dough to about ⅛-inch thickness.
- Cut Circles: Using a round cutter (about 3-4 inches in diameter, depending on your muffin tin size), cut out circles of dough. Reroll scraps as needed.
- Line Muffin Tin: Gently press each dough circle into the cups of your muffin tin, forming a small cup.
- Fill with Apples: Divide the apple filling evenly among the dough-lined cups, mounding it slightly.
- Add Topping:
- For Lattice: Place your woven lattice top over each tart.
- For Streusel: Sprinkle a generous amount of streusel topping over the apple filling in each tart.
- Egg Wash (Optional for Lattice): For a golden-brown finish on lattice-topped tarts, lightly brush the lattice with an egg wash (1 egg beaten with 1 teaspoon water).
- Bake: Bake for 25-35 minutes, or until the crust is golden brown and the apple filling is tender and bubbling. If the edges start to brown too quickly, you can loosely tent the tin with foil.
- Cool: Let the tarts cool in the muffin tin for about 10 minutes before carefully removing them to a wire rack to cool completely. This allows them to firm up.
Serving Suggestions
Mini apple tarts are delicious on their own, but a few additions can elevate them further:
- A dusting of powdered sugar: Simple, elegant, and adds a touch of sweetness.
- A drizzle of warm caramel sauce: The sweet, buttery notes of caramel pair beautifully with apples.
- A scoop of vanilla bean ice cream: The classic warm-and-cold combination is always a winner.
- A dollop of freshly whipped cream: Light, airy, and creamy – a perfect complement.
Tips for Success
- Keep Ingredients Cold: For a truly flaky crust, ensure your butter and water are very cold. This prevents the butter from melting too quickly and allows it to create steam pockets during baking, resulting in flakiness.
- Don’t Overwork the Dough: Handle the dough as little as possible to avoid developing tough gluten strands.
- Choose the Right Apples: A mix of tart and sweet apples (like Granny Smith for tartness and Honeycrisp for sweetness and texture) often yields the best flavor.
- Prevent Soggy Bottoms: Adding a tablespoon of flour or cornstarch to the filling helps absorb excess apple juices, preventing a soggy crust. Blind baking the crust for 10 minutes before filling can also help, though it’s often not necessary for mini tarts.
- Adjust Sugar to Apples: Taste your apples! If they are very sweet, you might want to slightly reduce the sugar in the filling. If they are very tart, you might need a touch more.
- Storage: Store leftover mini apple tarts at room temperature in an airtight container for up to 2 days, or in the refrigerator for up to 4 days. They can also be frozen for longer storage.
These hand-crafted mini apple tarts are a testament to the fact that great things often come in small packages. They’re a labor of love that rewards you with an incredibly satisfying and charming dessert. Whether you opt for the intricate beauty of a lattice top or the rustic charm of a streusel, each bite promises a burst of warm, spiced apple goodness cradled in a tender, flaky crust. Get ready to impress your taste buds and your guests with these delightful treats!