Country Fried Chicken: A dish that evokes warmth, comfort, and the undeniable taste of home. This isn’t just a meal; it’s a culinary hug, a crispy, tender embrace that transports you straight to a Southern kitchen, where the aroma of perfectly seasoned fried chicken fills the air. Forget complicated techniques and obscure ingredients; this recipe is about celebrating simplicity, quality, and the joy of a truly satisfying plate.
For many, country fried chicken is more than just food – it’s a memory. It’s Sunday dinners, family gatherings, and the comforting knowledge that some traditions are simply too good to let go. And while every family might have their own beloved version, the core elements remain the same: succulent chicken, a crunchy, flavorful coating, and a generous ladle of creamy, savory gravy.
This guide is designed to help you recreate that magic in your own kitchen. We’ll walk you through each step, from selecting the perfect cuts of chicken to achieving that coveted golden-brown crust and whipping up a rich, velvety gravy that ties the entire dish together. Get ready to embark on a delicious journey that will leave you with a newfound appreciation for this timeless classic.
The Heart of the Dish: Choosing Your Chicken
The foundation of any great country fried chicken starts with the chicken itself. While you can use a whole cut-up chicken, individual pieces often yield the best results for consistent cooking and serving.
What to Look For:
- Bone-in, Skin-on: This is crucial for flavor and moisture. The bone helps to distribute heat evenly, resulting in more tender meat, while the skin crisps up beautifully and provides a protective layer that keeps the chicken juicy.
- Freshness: Always opt for fresh, high-quality chicken. Look for plump pieces with healthy-looking skin.
- Common Cuts: Thighs, drumsticks, and breasts are popular choices. A mix of these offers variety and caters to different preferences. If using breasts, consider cutting larger ones in half or pounding them slightly to an even thickness for faster, more consistent cooking.
Preparation is Key:
Before you even think about dredging, proper chicken preparation makes all the difference.
- Rinse and Pat Dry: Gently rinse your chicken pieces under cool water and, most importantly, pat them thoroughly dry with paper towels. Excess moisture is the enemy of crispiness, as it creates steam rather than a direct heat connection for frying.
- Trim Excess Skin/Fat (Optional): While the skin is essential, you can trim any excessively fatty areas or loose bits of skin that might burn or become overly greasy during frying.
- Seasoning the Chicken Directly: Don’t rely solely on the flour mixture for flavor. A foundational seasoning directly on the chicken ensures every bite is flavorful. A simple mix of salt and black pepper, perhaps a hint of garlic powder, is a great start. Allow it to sit for a few minutes while you prepare your dredging station.
The Golden Coating: Achieving Perfection
The crispy, flavorful coating is what truly defines country fried chicken. It’s a simple process, but attention to detail ensures a magnificent crust.
The Dredging Station:
You’ll need a three-part dredging station to create that iconic coating:
- Seasoned Flour: This is the primary coating. Don’t skimp on seasoning here!
- Egg Wash/Buttermilk: The binder that helps the flour stick.
- Second Flour Dredge (Optional, but Recommended): For extra crispiness and a thicker crust.
Ingredients for the Coating:
- All-Purpose Flour: The standard choice for its texture and ability to crisp.
- Salt: Essential for flavor.
- Black Pepper: Adds a nice bite and classic flavor.
- Paprika: For a hint of color and mild, sweet pepper flavor.
- Garlic Powder: A savory depth that complements chicken beautifully.
- Onion Powder: Another layer of savory aromatics.
- Cayenne Pepper (Optional): If you like a subtle kick.
- Buttermilk: The secret weapon for tenderizing and adhesion. The lactic acid in buttermilk helps to tenderize the chicken slightly, and its thicker consistency clings better to the chicken than plain milk. If you don’t have buttermilk, you can make a substitute by adding 1 tablespoon of white vinegar or lemon juice to a cup of regular milk and letting it sit for 5-10 minutes until it curdles slightly.
The Dredging Process:
- Prepare Flour Mixture: In a shallow dish or large Ziploc bag, combine your flour with all the dry seasonings (salt, pepper, paprika, garlic powder, onion powder, cayenne if using). Whisk well to ensure all seasonings are evenly distributed.
- Prepare Buttermilk: Pour buttermilk into another shallow dish.
- Dredge:
- Take a seasoned chicken piece and first dredge it lightly in the seasoned flour, shaking off any excess.
- Dip the floured chicken into the buttermilk, ensuring it’s fully coated. Let any excess drip off.
- Return the chicken to the seasoned flour mixture. This time, press the flour onto the chicken firmly, ensuring every surface is well-coated. Don’t be shy! The more flour that adheres, the crispier your crust will be.
- Place the coated chicken pieces on a wire rack set over a baking sheet.
- Resting Period (Crucial!): This step is often overlooked but is incredibly important. Let the dredged chicken pieces rest on the wire rack for at least 15-30 minutes at room temperature. This allows the moisture from the buttermilk to hydrate the flour, creating a paste-like layer that will adhere much better during frying, preventing the coating from falling off.
Frying to Perfection: The Right Heat and Oil
Frying is where the magic truly happens, transforming that floured chicken into a golden masterpiece.
Choosing Your Oil:
- High Smoke Point: You need an oil that can withstand high temperatures without breaking down or smoking. Vegetable oil, canola oil, and peanut oil are excellent choices.
- Neutral Flavor: These oils also have a neutral flavor, allowing the taste of the chicken and its seasoning to shine through.
The Frying Vessel:
A heavy-bottomed pot or a large cast-iron skillet is ideal. Cast iron, in particular, excels at retaining and distributing heat evenly, which is crucial for consistent frying.
Temperature Control is Key:
This is arguably the most critical aspect of frying. Too low, and your chicken will absorb too much oil and be greasy. Too high, and the outside will burn before the inside cooks through.
- Heat the Oil: Pour enough oil into your skillet to come about 1 to 1.5 inches up the sides. Heat the oil over medium-high heat until it reaches 325-350°F (160-175°C). An instant-read thermometer is your best friend here. If you don’t have one, you can test the oil by dropping a pinch of flour in; it should sizzle immediately but not burn.
- Fry in Batches: Do not overcrowd the skillet! Frying too many pieces at once will drastically drop the oil temperature, leading to greasy, soggy chicken. Fry 2-3 pieces at a time, depending on the size of your skillet.
- The Frying Process:
- Carefully place the chicken pieces, skin-side down first, into the hot oil using tongs.
- Maintain the oil temperature. Adjust the heat as needed to keep it within the 325-350°F range.
- Fry for about 6-8 minutes per side, turning carefully with tongs, until the chicken is a deep golden brown and cooked through. The total cooking time will vary depending on the size and cut of the chicken, usually ranging from 15-25 minutes.
- Internal Temperature: The most accurate way to check for doneness is with an instant-read thermometer. Chicken is safely cooked when it reaches an internal temperature of 165°F (74°C) in the thickest part of the meat, avoiding the bone.
- Keep Warm: As each batch finishes, transfer the cooked chicken to a wire rack set over a baking sheet lined with paper towels (this allows air circulation, preventing the bottom from getting soggy) and place it in a warm oven (around 200°F/95°C) while you fry the remaining batches.
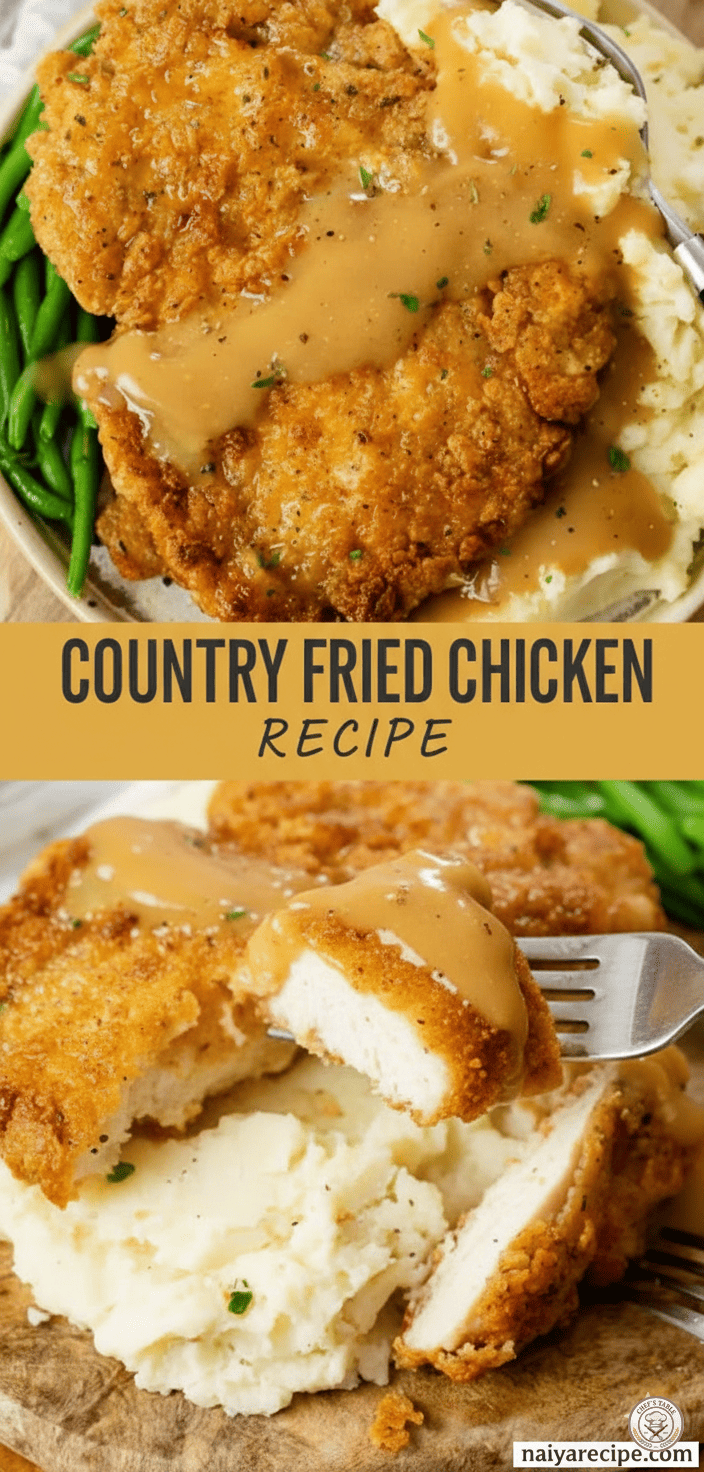
The Essential Accompaniment: Creamy Gravy
What is country fried chicken without its creamy, savory gravy? This is not an optional extra; it’s an integral part of the experience, designed to complement the crispy chicken and mashed potatoes.
Using the Pan Drippings:
The secret to incredible gravy lies in the flavorful drippings left in the skillet after frying the chicken. These brown bits (fond) are packed with concentrated chicken and seasoning flavor.
Ingredients for the Gravy:
- Leftover Frying Oil/Chicken Drippings: About 1/4 cup.
- All-Purpose Flour: To create a roux, thickening the gravy.
- Milk (Any Kind): Whole milk offers the richest flavor and creamiest texture.
- Chicken Broth/Stock: Adds depth of flavor.
- Salt and Black Pepper: To taste.
Making the Gravy:
- Prepare the Skillet: Carefully pour off most of the frying oil from the skillet, leaving about 1/4 cup of oil and all the flavorful browned bits (scraps of crust and seasoning). Place the skillet back over medium-low heat.
- Make the Roux: Sprinkle 1/4 cup of flour into the hot oil/drippings. Whisk constantly for 1-2 minutes, creating a smooth paste (roux). Cook until the roux is lightly golden brown; this cooks out the raw flour taste.
- Add Liquids Gradually: Slowly pour in about 1 cup of chicken broth, whisking continuously to prevent lumps. Once smooth, slowly add 1 cup of milk, again whisking constantly.
- Simmer and Thicken: Bring the gravy to a gentle simmer, continuing to whisk occasionally. It will thicken as it cooks. If it’s too thick, add a little more milk or broth until it reaches your desired consistency. If it’s too thin, let it simmer a bit longer, or if necessary, make a slurry of a teaspoon of flour mixed with a tablespoon of cold water and whisk it in, simmering for another minute.
- Season: Season the gravy generously with salt and black pepper to taste. You might need more than you think, as the flour can mute flavors.
Serving Suggestions
Country fried chicken is best served immediately, while the crust is still crisp and the chicken is piping hot.
Classic Pairings:
- Creamy Mashed Potatoes: A must-have! The perfect vehicle for that rich gravy.
- Green Beans: Steamed, sautéed with a touch of garlic, or simmered with a hint of onion, green beans provide a fresh counterpoint.
- Warm Biscuits: Ideal for soaking up any leftover gravy or for a bite between chicken pieces.
- Corn on the Cob or Creamed Corn: Another Southern staple that fits perfectly.
Troubleshooting Tips
- Soggy Chicken: This usually means your oil wasn’t hot enough, or you overcrowded the pan. Ensure proper oil temperature and fry in batches. The resting period for the dredged chicken also helps.
- Coating Falling Off: Not letting the dredged chicken rest is a common culprit. Also, ensure the chicken is patted very dry before dredging.
- Chicken Burned Outside, Raw Inside: Oil was too hot. Lower the temperature and cook for a longer duration. If you find this happening, you can finish the chicken in a preheated oven (around 350°F/175°C) after it’s golden brown on the outside, until it reaches the internal temperature of 165°F (74°C).
- Lumpy Gravy: Not whisking constantly when adding liquids to the roux is the cause. If it happens, you can push the gravy through a fine-mesh sieve for a smoother consistency.
A Timeless Classic
Country fried chicken is more than just a recipe; it’s a testament to the enduring appeal of simple, honest, and delicious food. It’s a dish that brings people together, offering comfort and satisfaction with every bite. The crispy exterior, the tender, juicy interior, and the rich, velvety gravy combine to create an experience that is both nostalgic and deeply satisfying.
So, roll up your sleeves, gather your ingredients, and prepare to create a meal that will earn you rave reviews. Whether it’s for a casual weeknight dinner or a special gathering, this country fried chicken recipe is sure to become a cherished favorite in your culinary repertoire. Enjoy the process, savor the aromas, and delight in the incredible flavors of this beloved classic. Happy cooking!