Are you craving that delightful, crispy, and sweet-savory goodness you find at your favorite Chinese buffet? Look no further! This recipe for Chinese Buffet Coconut Shrimp will bring the magic of those golden, succulent shrimp right into your kitchen. Forget about the fuss of going out; with this guide, you can recreate that beloved dish with ease, and we promise, it tastes even better when it’s homemade.
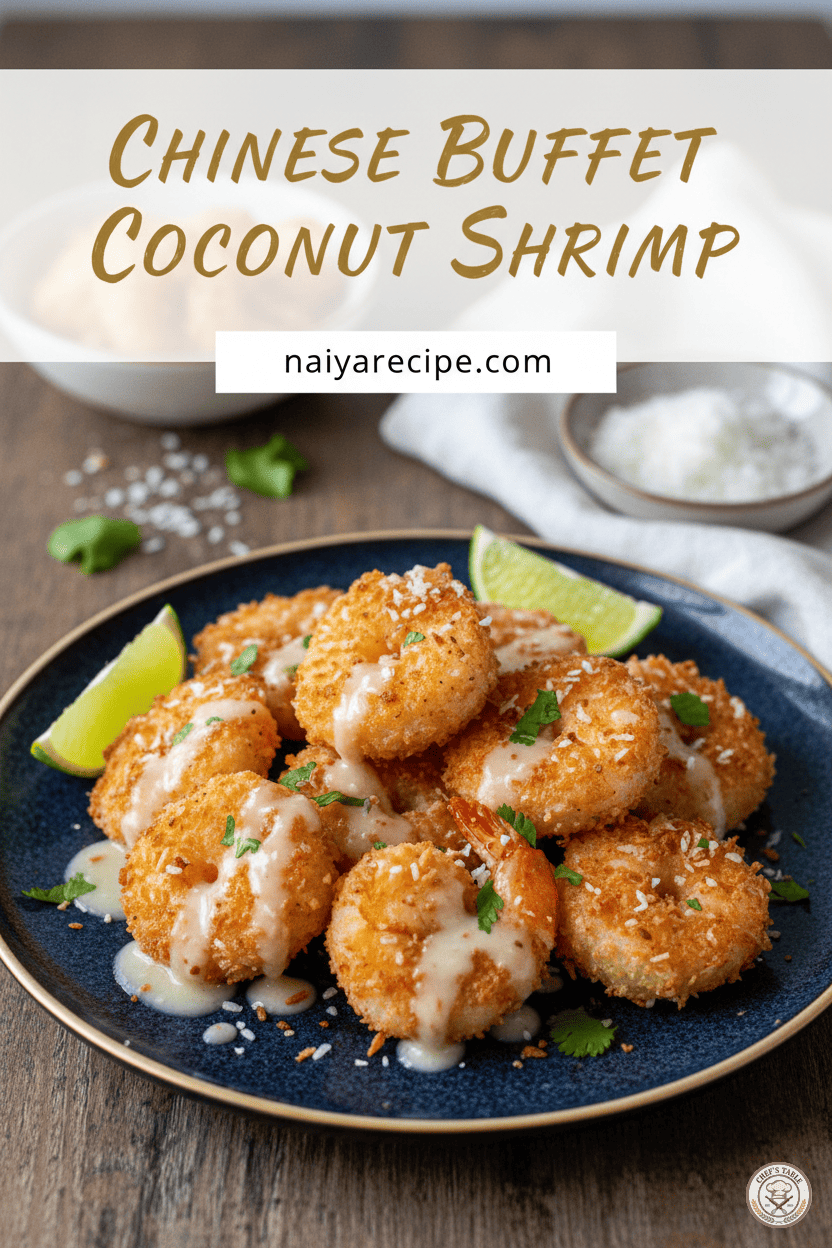
Coconut shrimp is a dish that truly captivates with its unique blend of textures and flavors. The exterior boasts a golden-brown, crunchy coating of breadcrumbs and coconut flakes, offering a satisfying bite. Inside, the shrimp remains tender and juicy, cooked to perfection. Drizzled with a creamy, tangy, and slightly sweet sauce, each bite is an explosion of tropical and savory notes that dance on your palate. It’s a dish that appeals to both adults and children, making it a fantastic option for family dinners, gatherings, or even a special treat for yourself.
The beauty of making coconut shrimp at home is the control you have over the ingredients. You can select the freshest shrimp, adjust the seasoning to your liking, and ensure every piece is coated just right. Plus, the aroma that fills your kitchen as these golden beauties fry is simply irresistible. This recipe focuses on simple, accessible ingredients and clear, easy-to-follow steps, ensuring a successful culinary adventure even for novice cooks.
The History and Appeal of Coconut Shrimp
While often found in Chinese buffets and Asian-inspired restaurants, coconut shrimp isn’t strictly a traditional Chinese dish. It’s more of a fusion creation that has gained immense popularity in Western countries, likely influenced by various Asian and Caribbean culinary traditions. The use of coconut in savory dishes is common in many tropical regions, providing a rich flavor and often a pleasant texture. When combined with shrimp, a universally loved seafood, and a crispy coating, it creates a dish that’s hard to resist.
The appeal lies in its indulgent nature. It feels like a treat, something a bit special. The combination of sweet coconut and savory shrimp, often paired with a vibrant dipping sauce, makes it a multi-faceted culinary experience. It’s also incredibly versatile – it can be served as an appetizer, a side dish, or even as a light main course when accompanied by a fresh salad or some steamed rice.
Why This Recipe Works
This recipe is designed for maximum flavor and ease. We’ll walk you through selecting the best shrimp, preparing a perfectly balanced coating, and frying them to golden perfection. The accompanying sauce is a crucial element, adding a bright counterpoint to the richness of the fried shrimp.
Fresh Ingredients: Starting with fresh, high-quality shrimp is paramount. It ensures the best flavor and texture.
Double Coating Method: Our method ensures a thick, even, and super crispy crust that locks in the moisture of the shrimp.
Flavorful Sauce: The dipping sauce is simple to prepare but packed with flavor, complementing the coconut shrimp beautifully without overpowering it.
No Deep Fryer Needed: You don’t need fancy equipment. A regular skillet or a deep pot works perfectly for frying.
Ingredients You’ll Need
Gathering your ingredients before you start cooking is a golden rule in the kitchen. It makes the process smoother and more enjoyable.
For the Coconut Shrimp:
- Shrimp: 1 pound large shrimp (16-20 count), peeled and deveined, tails on (or off, if preferred)
Tip:* Using shrimp with the tails on makes for a prettier presentation and provides a convenient “handle” for eating.
- All-Purpose Flour: ½ cup
- Cornstarch: ¼ cup (for extra crispiness)
- Baking Powder: ½ teaspoon (helps with lightness and crispness of the coating)
- Salt: ½ teaspoon
- Black Pepper: ¼ teaspoon
- Eggs: 2 large, lightly beaten
- Sweetened Shredded Coconut: 1 cup
- Panko Breadcrumbs: 1 cup (Panko gives a superior crunch compared to regular breadcrumbs)
- Vegetable Oil or Canola Oil: 3-4 cups, for frying (enough to submerge the shrimp partially or fully)
For the Dipping Sauce:
- Mayonnaise: ½ cup
- Sweet Chili Sauce: 2 tablespoons
- Honey or Agave Nectar: 1 tablespoon (adjust to your sweetness preference)
- Lime Juice: 1 tablespoon (freshly squeezed is best)
- A pinch of Salt: To balance the flavors
Step-by-Step Instructions
Let’s get cooking! Follow these steps carefully for the best homemade coconut shrimp.
Step 1: Prepare the Shrimp
- If your shrimp are frozen, thaw them completely in the refrigerator or under cold running water.
- Pat the peeled and deveined shrimp very dry with paper towels. This is a crucial step as excess moisture can prevent the coating from sticking and result in less crispy shrimp.
- Place the dry shrimp on a plate and set aside.
Step 2: Set Up Your Breading Stations
You’ll need three separate shallow dishes or bowls for the breading process.
- Station 1 (Flour Mixture): In the first dish, combine the all-purpose flour, cornstarch, baking powder, salt, and black pepper. Whisk well to ensure all ingredients are evenly distributed.
- Station 2 (Egg Wash): In the second dish, lightly beat the two large eggs.
- Station 3 (Coconut-Panko Mixture): In the third dish, combine the sweetened shredded coconut and panko breadcrumbs. Mix them together thoroughly.
Step 3: Bread the Shrimp
This is where the magic happens! The double-coating method ensures a super crispy crust.
- Take one shrimp at a time and dredge it first in the flour mixture, shaking off any excess. Make sure it’s fully coated.
- Next, dip the flour-coated shrimp into the egg wash, allowing any excess egg to drip off.
- Finally, generously coat the shrimp in the coconut-panko mixture. Press gently to ensure the coconut and panko adhere well to the shrimp. Place the breaded shrimp on a clean plate or baking sheet lined with parchment paper.
- Repeat this process with all the remaining shrimp.
- Optional but Recommended: Once all shrimp are breaded, place the plate/baking sheet in the refrigerator for at least 15-20 minutes. This helps the coating adhere even better and prevents it from falling off during frying.
Step 4: Prepare the Dipping Sauce
While the shrimp are chilling, you can quickly whip up the delicious dipping sauce.
- In a small bowl, combine the mayonnaise, sweet chili sauce, honey (or agave nectar), fresh lime juice, and a pinch of salt.
- Whisk all the ingredients together until smooth and well combined.
- Taste and adjust the sweetness or tanginess to your preference. If you like it sweeter, add a little more honey. If you prefer more tang, a dash more lime juice will do the trick.
- Cover the bowl and place it in the refrigerator until ready to serve.
Step 5: Fry the Coconut Shrimp
Now for the exciting part – frying those golden beauties!
- In a large, heavy-bottomed skillet or a deep pot, pour the vegetable or canola oil to a depth of about 2-3 inches.
- Heat the oil over medium-high heat until it reaches 350-375°F (175-190°C). If you don’t have a thermometer, you can test the oil by dropping a tiny pinch of the breading mixture into it. If it sizzles and turns golden within a few seconds, the oil is ready.
- Carefully place the breaded shrimp into the hot oil, frying in batches to avoid overcrowding the pan. Overcrowding can lower the oil temperature and result in soggy shrimp.
- Fry the shrimp for 2-3 minutes per side, or until they are golden brown and cooked through. The shrimp will turn pink and opaque when done.
- Using a slotted spoon or tongs, carefully remove the cooked shrimp from the oil and transfer them to a plate lined with paper towels to drain any excess oil.
- Repeat with the remaining batches of shrimp.
Step 6: Serve and Enjoy!
Once all the coconut shrimp are fried, arrange them beautifully on a serving platter. Serve immediately with the chilled dipping sauce on the side. Garnish with a sprinkle of fresh chopped cilantro or a few lime wedges for an extra touch of freshness and color.
Tips for Success
- Don’t Overcook the Shrimp: Shrimp cooks very quickly. Overcooked shrimp becomes rubbery and tough. As soon as it turns pink and opaque, it’s done.
- Maintain Oil Temperature: Keeping the oil at the right temperature is key for crispy, evenly cooked shrimp. If the oil is too cool, the shrimp will absorb too much oil and become greasy. If it’s too hot, the coating will burn before the shrimp cooks through.
- Fry in Batches: As mentioned, overcrowding the pan is a common mistake. Give your shrimp space to fry properly.
- Pat Dry, Pat Dry, Pat Dry: Seriously, we can’t stress this enough. Dry shrimp equals crispy shrimp.
- Experiment with the Sauce: While our dipping sauce is fantastic, feel free to customize it. A little grated fresh ginger, a dash of sriracha for heat, or even a touch of orange zest could elevate it further.
Variations and Serving Suggestions
This recipe is fantastic as is, but here are a few ideas to switch things up or create a complete meal:
- Spicy Kick: Add a pinch of cayenne pepper or red pepper flakes to the flour mixture for a subtle heat in the shrimp coating.
- Citrus Zest: Incorporate a teaspoon of lime or orange zest into the coconut-panko mixture for an extra layer of bright flavor.
- Herbaceous Touch: A little finely chopped fresh parsley or chives mixed into the panko can add a fresh note.
- Meal Idea: Serve your coconut shrimp alongside a vibrant Asian-inspired salad with a ginger-sesame dressing, or with a simple bowl of steamed jasmine rice and some stir-fried vegetables.
- Appetizer Platter: Arrange the shrimp with other finger foods like spring rolls, vegetable skewers, and various dipping sauces for an impressive appetizer spread.
Nutritional Information (Estimate per serving, without exact measurements and brands)
While we encourage enjoying delicious food, it’s also good to be mindful of what we consume. Coconut shrimp, being fried, is an indulgent dish.
- Calories: Approximately 300-400 calories per serving (3-4 large shrimp, without sauce)
- Protein: High, due to the shrimp.
- Fats: Moderate to high, primarily from the oil and coconut.
- Carbohydrates: Moderate, from the breading and sweetened coconut.
Remember, these are rough estimates, and actual values will vary based on exact portion sizes, types of oil used, and specific ingredients.
Storage and Reheating
Coconut shrimp is best enjoyed fresh, straight out of the fryer, when the coating is at its crispiest. However, if you have leftovers, here’s how to store and reheat them:
- Storage: Store leftover coconut shrimp in an airtight container in the refrigerator for up to 2-3 days. The coating will soften over time.
- Reheating: To regain some of the crispiness, it’s best to reheat coconut shrimp in an oven or air fryer.
- Oven: Preheat your oven to 375°F (190°C). Spread the shrimp in a single layer on a baking sheet and bake for 8-12 minutes, or until heated through and crispy.
- Air Fryer: Place the shrimp in a single layer in the air fryer basket. Air fry at 350°F (175°C) for 5-7 minutes, shaking the basket halfway through, until hot and crispy.
Avoid microwaving:* Microwaving will make the shrimp soggy.
Conclusion
Bringing the flavors of a Chinese buffet into your home has never been easier or more delicious. This homemade Chinese Buffet Coconut Shrimp recipe delivers on all fronts: crispy, succulent shrimp with a perfectly balanced sweet and savory profile, all enhanced by a tangy dipping sauce. It’s a rewarding dish to make and an absolute joy to eat.
Whether you’re looking to impress guests, treat your family to something special, or simply satisfy a craving, this recipe is a fantastic choice. The process is straightforward, the ingredients are accessible, and the results are undeniably restaurant-quality. So, roll up your sleeves, gather your ingredients, and get ready to enjoy some of the best coconut shrimp you’ve ever tasted. Happy cooking!