
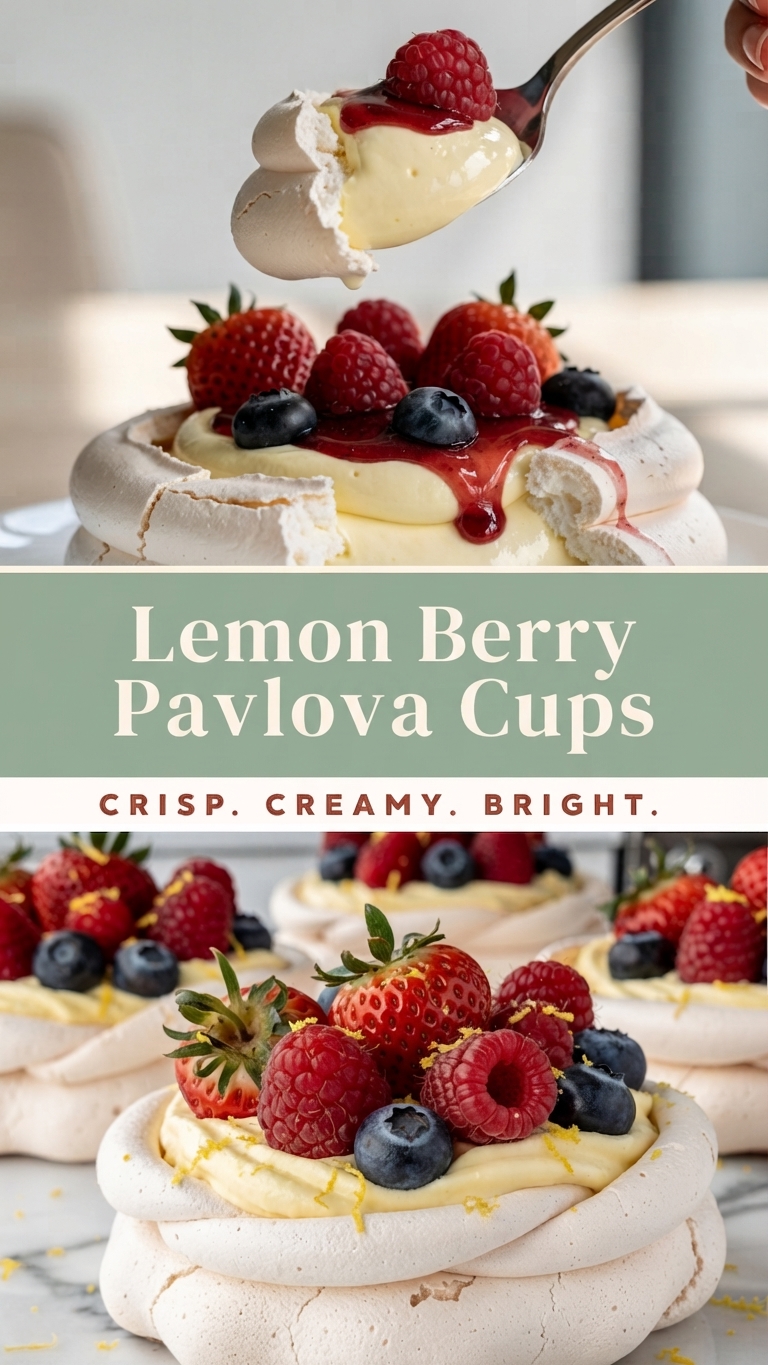
Lemon Berry Pavlova Cups: A Crisp and Creamy Dessert
Elevate your dessert game with these stunning Lemon Berry Pavlova Cups. Perfectly crisp on the outside with a marshmallow-soft center, each meringue shell is generously filled with a bright, zesty lemon curd and piled high with fresh, vibrant berries. It’s an elegant yet surprisingly simple dessert that captures the essence of summer in every bite.
The beauty of this recipe lies in its contrast of textures and flavors: the delicate crunch of the meringue, the silky, tart-sweet lemon curd, and the fresh pop of strawberries, raspberries, and blueberries. Whether you’re hosting a dinner party, celebrating a special occasion, or simply treating yourself to a mid-week delight, these individual pavlovas are sure to impress. Follow this guide to create a dessert that is as beautiful to look at as it is delicious to eat.
Ingredients
Here is everything you need to make these delightful Lemon Berry Pavlova Cups.
For the Pavlova Shells (Meringue Cups):
-
4 large egg whites, at room temperature
-
1 cup (200g) granulated sugar
-
1 teaspoon lemon juice (or white vinegar)
-
1 teaspoon cornstarch
For the Lemon Curd Filling:
-
½ cup (120ml) fresh lemon juice (about 3-4 lemons)
-
Zest of 2 lemons, finely grated
-
½ cup (100g) granulated sugar
-
4 large egg yolks
-
½ cup (113g) unsalted butter, cut into small cubes
For the Topping:
-
1 cup (240ml) heavy whipping cream
-
1 tablespoon powdered sugar
-
½ teaspoon vanilla extract
-
1 cup mixed fresh berries (strawberries, raspberries, blueberries)
-
Additional lemon zest, for garnish
Instructions
Follow these step-by-step instructions to achieve perfect pavlova cups and silky lemon curd.
Step 1: Make the Meringue Shells
-
Preheat & Prepare: Preheat your oven to 250°F (120°C). Line a large baking sheet with parchment paper. Draw 6-8 circles (about 3-4 inches or 7-10cm in diameter) on the parchment paper as a guide, then flip the paper over so the ink/pencil is on the underside.
-
Whip Egg Whites: In a large, clean, dry glass or metal bowl, use an electric mixer (whisk attachment) to beat the egg whites on medium speed until soft peaks form.
-
Add Sugar Gradually: With the mixer running, add the granulated sugar 1 tablespoon at a time, beating well after each addition. Continue to beat until the mixture is stiff, glossy, and holds its shape. This process takes about 5-7 minutes. When you rub a small amount between your fingertips, you should not feel any sugar granules.
-
Stabilize: Gently fold in the lemon juice (or vinegar) and cornstarch using a spatula. This helps create the soft, marshmallowy center.
-
Shape: Spoon or pipe the meringue onto the prepared parchment paper circles. Use the back of a spoon or a small offset spatula to create a well or indentation in the center of each meringue, building up the sides to form a cup shape.
-
Bake: Place the baking sheet in the preheated oven. Bake for 75-90 minutes. The shells should be pale and crisp on the outside.
-
Cool Down: Turn off the oven, but leave the pavlova shells inside the oven with the door slightly ajar for at least 1 hour, or until completely cool. This slow cooling process prevents cracking.
Step 2: Prepare the Lemon Curd
-
Combine Wet Ingredients: In a medium saucepan, whisk together the fresh lemon juice, lemon zest, sugar, and egg yolks until well combined.
-
Cook and Thicken: Place the saucepan over medium-low heat. Cook, stirring constantly and gently with a whisk or wooden spoon, for 8-12 minutes. The curd will thicken enough to coat the back of a spoon. Be careful not to boil the mixture, or the eggs may scramble.
-
Strain: Immediately remove the pan from the heat and pour the curd through a fine-mesh sieve into a clean bowl to remove any zest or cooked egg bits.
-
Incorporate Butter: Whisk the cubed butter into the warm lemon curd, one piece at a time, until fully melted and incorporated. The curd will become glossy and smooth.
-
Cool: Cover the surface of the curd directly with plastic wrap to prevent a skin from forming. Let it cool to room temperature, then refrigerate for at least 2 hours, or until completely chilled and firm.
Step 3: Assemble and Serve
-
Whip the Cream: In a chilled bowl, use an electric mixer to beat the heavy whipping cream, powdered sugar, and vanilla extract until stiff peaks form.
-
Fill the Shells: Gently place the cooled pavlova shells on serving plates. If the center has risen slightly, use the back of a spoon to re-press the indentation.
-
Layer: Fill the well of each pavlova shell with a generous amount of the chilled lemon curd. Top the lemon curd with a dollop of the whipped cream.
-
Decorate: Pile the fresh mixed berries (strawberries, raspberries, blueberries) artfully over the whipped cream.
-
Garnish and Serve: Finish with a light dusting of fresh lemon zest. Serve immediately while the pavlovas are crisp.
Tips for Success
-
The Perfect Meringue: Ensure your mixing bowl and beaters are completely free of any grease or oil, as this will prevent the egg whites from whipping up properly. Room temperature egg whites also achieve better volume.
-
Avoid Humidity: Pavlovas are best made on a dry day. Humidity can make meringues soft and sticky.
-
Don’t Rush Cooling: Allowing the meringues to cool slowly inside the turned-off oven is crucial for preventing cracking.
-
Make Ahead: The meringue shells can be baked 1-2 days in advance and stored in an airtight container at room temperature. The lemon curd can be made and refrigerated for up to a week. Assemble the pavlovas just before serving.
Storage and Reheating
-
Storage: Once assembled, these pavlovas are best eaten immediately. If you have leftovers, they can be stored in the refrigerator for a few hours, but the meringue will begin to soften and absorb moisture from the curd and cream.
-
Make-Ahead Components: The individual components (baked meringue shells, cooled lemon curd, whipped cream) can be stored separately in the refrigerator (or airtight container for the meringues) for up to 2 days before assembly.
Serving Suggestions
These Lemon Berry Pavlova Cups are a showstopping dessert on their own. However, you can enhance the experience by serving them alongside:
-
A Drizzle: A light drizzle of raspberry coulis or warm honey.
-
An Extra Crunch: A sprinkle of toasted sliced almonds or pistachios.
-
Herbal Freshness: A small sprig of fresh mint or a few edible flowers for an elegant garnish.
Conclusion
There are few desserts more delightful than a fresh pavlova. The combination of the light, airy meringue, the sharp tang of the lemon curd, and the sweetness of the fresh berries creates a symphony of flavors and textures that is hard to resist. While it may seem like a complex dessert, breaking it down into manageable steps makes it an achievable project for any home baker.
These Lemon Berry Pavlova Cups are perfect for spring and summer entertaining, but they are bright enough to bring a touch of sunshine to any time of year. Gather your ingredients, enjoy the process of creating this edible art, and savor every crisp, creamy bite with your family and friends.