
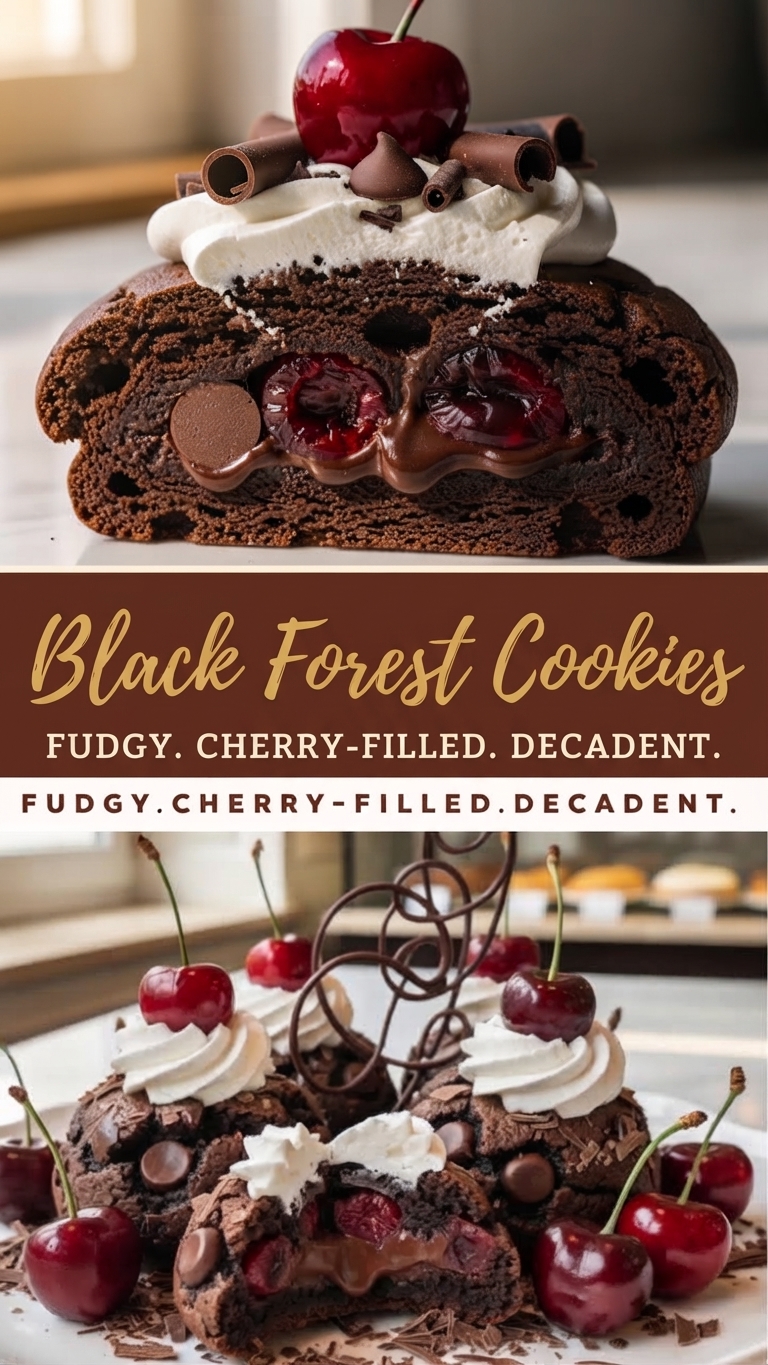
Decadent Black Forest Cookie Stacks
Introducing the ultimate fusion of classic German Black Forest cake and rich, fudgy chocolate cookies. These Black Forest Cookie Stacks are not your average treat. Picture this: a dense, chewy chocolate cookie base, baked to perfection and stuffed with a gooey, vibrant cherry filling and melted chocolate. But we don’t stop there. Each cookie is crowned with a generous swirl of stabilized whipped cream, a glossy fresh cherry with its stem intact, and delicate chocolate curls.
The contrast is simply irresistible. The slightly tart, sweet cherry filling cuts through the intensely rich chocolate, while the light, airy whipped cream provides a textural balance to the fudgy cookie. Every bite is a decadent experience that looks bakery-worthy but is achievable in your own kitchen. Whether you’re looking to impress guests or just indulge in a serious chocolate craving, these cookie stacks deliver. Let’s dive into how to create these show-stopping treats.
Ingredients
For the Fudgy Chocolate Cookies:
-
1 cup (2 sticks or 226g) unsalted butter, melted and slightly cooled
-
¾ cup (150g) granulated sugar
-
¾ cup (165g) packed light brown sugar
-
2 large eggs, at room temperature
-
2 teaspoons vanilla extract
-
1 ½ cups (185g) all-purpose flour
-
¾ cup (75g) unsweetened cocoa powder (Dutch-processed preferred for a richer color)
-
1 teaspoon baking soda
-
½ teaspoon salt
-
1 cup (170g) semi-sweet chocolate chips or chunks
For the Cherry Filling:
-
2 cups (approx. 300g) fresh sweet cherries, pitted and halved (or frozen, thawed and drained)
-
¼ cup (50g) granulated sugar
-
1 tablespoon cornstarch
-
2 tablespoons water
-
1 teaspoon lemon juice
-
½ teaspoon almond extract
For the Whipped Cream Topping & Garnish:
-
1 ½ cups (360ml) heavy whipping cream, chilled
-
3 tablespoons powdered sugar
-
1 teaspoon vanilla extract
-
Additional fresh cherries with stems (for garnish)
-
Chocolate curls or shavings (for garnish)
Instructions
Phase 1: The Cherry Filling
-
Combine: In a small saucepan, combine the pitted and halved cherries, granulated sugar, cornstarch, water, lemon juice, and almond extract.
-
Simmer: Place the saucepan over medium heat. Stirring occasionally, bring the mixture to a gentle simmer.
-
Thicken: Continue to simmer, stirring more frequently, for about 5-7 minutes, or until the cherries have softened and the liquid has thickened into a glossy syrup.
-
Cool: Remove from heat and transfer the cherry filling to a bowl. Let it cool completely to room temperature before using in the cookies. You can make this ahead of time and store it in the refrigerator.
Phase 2: The Chocolate Cookies
-
Prepare Oven & Pan: Preheat your oven to 350°F (175°C). Line two large baking sheets with parchment paper.
-
Mix Wet Ingredients: In a large bowl, whisk together the melted butter, granulated sugar, and brown sugar until well combined. Add the eggs one at a time, whisking well after each addition. Stir in the vanilla extract.
-
Mix Dry Ingredients: In a separate medium bowl, sift together the flour, cocoa powder, baking soda, and salt. Gradually add the dry ingredients to the wet ingredients, mixing with a spatula until just combined. Do not overmix. Fold in the chocolate chips.
-
Scoop & Fill: Using a large cookie scoop (about 3 tablespoons), scoop a portion of dough and place it on the prepared baking sheet. Use your thumb to make a deep indentation in the center of the dough ball.
-
Add Filling: Spoon about 1-2 teaspoons of the cooled cherry filling into the indentation.
-
Seal: Take another scoop of dough and flatten it slightly with your hands. Place this flattened disc over the top of the filled dough ball. Gently pinch and seal the edges around the sides to completely encase the cherry filling. Roll the filled cookie gently between your palms to smooth it into a neat ball. Place it back on the baking sheet, sealing side up. Repeat with the remaining dough.
-
Bake: Space the cookies at least 2 inches apart on the baking sheets. Bake for 10-12 minutes, or until the edges are set and the tops are cracked but the centers still look slightly soft.
-
Cool: Allow the cookies to cool on the baking sheet for 5 minutes before transferring them to a wire rack to cool completely. This resting period is crucial for the cherry filling to set inside the cookie.
Phase 3: The Assembly
-
Whip the Cream: In a large, chilled bowl, beat the heavy whipping cream, powdered sugar, and vanilla extract with an electric mixer (whisk attachment preferred) on medium-high speed until stiff peaks form. Be careful not to overbeat (it will turn into butter).
-
Assemble Stacks: Once the cookies are completely cool, it’s time to stack. Place one cookie on a serving plate. Using a piping bag fitted with a large star tip (like a 1M or 2D) or simply a spoon, dollop or pipe a generous swirl of the whipped cream onto the center of the cookie.
-
Garnish: Gently place a fresh cherry with its stem on top of the whipped cream. Sprinkle with chocolate curls or shavings.
-
Serve: For the full effect, stack two cookies with a layer of whipped cream in between, then top the second cookie with more whipped cream, a cherry, and chocolate curls.
Tips for Success
-
Room Temperature Ingredients: Ensure your butter and eggs are at room temperature so they emulsify properly, creating a better cookie texture.
-
Don’t Overfill: Be careful not to put too much cherry filling in the cookie, or it may burst during baking. A teaspoon or two is sufficient.
-
Seal Properly: Take your time sealing the cookies to prevent the filling from leaking out. The cookie dough is sticky, which helps with this process.
-
Use Stabilized Whipped Cream (Optional): If you’re making these ahead of time, consider stabilizing the whipped cream so it doesn’t deflate. Add a tablespoon of instant vanilla pudding mix or a small amount of softened cream cheese (about 2 oz) to the heavy cream before whipping.
-
Dutch-Processed Cocoa: While regular unsweetened cocoa works, Dutch-processed cocoa has a darker color and a milder, less acidic flavor that is characteristic of Black Forest desserts.
Storage & Reheating
-
Storage: Because these contain fresh fruit and whipped cream, they are best consumed the day they are assembled. However, you can store leftover assembled cookies in an airtight container in the refrigerator for up to 2 days. The cookies may soften slightly over time.
-
Make-Ahead: The baked cookies (without toppings) can be stored in an airtight container at room temperature for up to 3 days. The cherry filling can be made and refrigerated for up to 5 days. Whip the cream fresh just before assembling.
Serving Suggestions
-
These cookies are a showstopper on their own, but you can elevate them by serving them warm with a scoop of vanilla bean ice cream.
-
Pair with a cup of hot coffee or a glass of cold milk to balance the richness of the chocolate and cherries.
-
They are perfect for special occasions, holidays, or whenever you want to treat yourself to something extra special.
Closing
These Black Forest Cookie Stacks are more than just a cookie; they are a decadent dessert experience. Combining the best elements of a classic cake into a handheld, shareable treat, they are guaranteed to become a new favorite. From the fudgy bite to the sweet cherry burst and the creamy finish, every element works in harmony. We hope you enjoy baking and, most importantly, eating these delightful creations!