There’s something incredibly nostalgic and comforting about the smell of apple pie baking. It evokes memories of crisp autumn days, family gatherings, and the simple joy of a homemade dessert. But let’s be honest, making a full apple pie can sometimes feel like a bit of an undertaking. That’s where these Handmade Apple Pie Bars come in! They capture all the beloved flavors and textures of a classic apple pie in a convenient, easy-to-make bar form. Perfect for sharing, snacking, or satisfying that sweet craving, these bars are destined to become a staple in your recipe collection.
What makes these bars so special? It’s the perfect harmony of a buttery, tender shortbread-like crust, a luscious spiced apple filling, and a delightful crumble topping that adds just the right amount of texture. The best part? They are incredibly forgiving and require minimal fuss, making them an ideal project for bakers of all skill levels. Whether you’re a seasoned pro or just starting your baking journey, you’ll find immense satisfaction in creating these delicious treats.
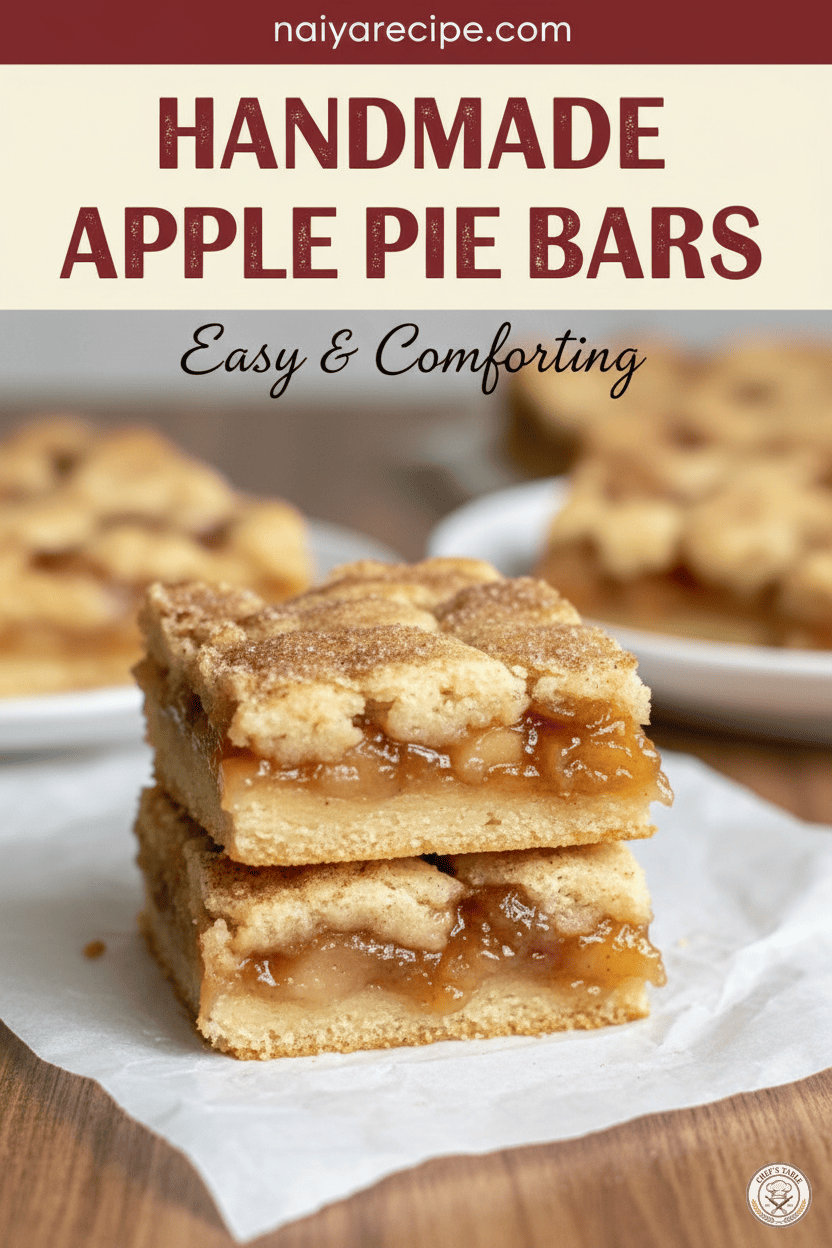
The Magic of Apple Pie in a Bar
Imagine biting into a soft, chewy bar, where the tang of sweet apples meets the warmth of cinnamon and a hint of nutmeg, all nestled between layers of buttery goodness. That’s precisely what you get with these Handmade Apple Pie Bars. Unlike a traditional pie, which can be tricky to slice and serve, these bars are perfectly portioned and easy to transport, making them ideal for potlucks, picnics, or lunchbox treats.
The foundation of these bars is a simple yet incredibly flavorful crust that doubles as the base and the crumble topping. This brilliant technique saves time and effort, streamlining the baking process without sacrificing taste or texture. The apples, a star ingredient, are gently cooked with warming spices, creating a filling that’s both tender and bursting with natural sweetness. Each bite delivers a comforting hug of flavor, reminiscent of your favorite apple pie, but with an added layer of convenience.
Why You’ll Love This Recipe
- Easy to Make: With straightforward steps and common ingredients, this recipe is perfect for beginners and experienced bakers alike.
- Crowd-Pleaser: These bars are universally loved! The classic apple pie flavor makes them a hit with everyone.
- Perfect for Any Occasion: From casual family desserts to holiday gatherings, these bars fit right in.
- Portable: Easily transportable, they’re great for picnics, office parties, or a thoughtful gift.
- Customizable: While delicious as is, you can easily adapt the spices or add a drizzle of caramel for an extra touch.
- Comforting: The aroma alone will make your home feel cozy and inviting.
Key Ingredients and Why They Work
The beauty of this recipe lies in its simplicity and the way a few humble ingredients come together to create something extraordinary.
- All-Purpose Flour: Forms the structure of our buttery crust and crumble. Using all-purpose flour ensures a tender yet sturdy base.
- Granulated Sugar: Sweetens both the crust and the apple filling, balancing the tartness of the apples.
- Brown Sugar: Adds a deeper, more molasses-like sweetness and a hint of caramel note to the apple filling, enhancing its richness.
- Unsalted Butter: The hero of the crust! Cold butter, cut into cubes, creates a flaky, tender texture in the base and a rich flavor in the crumble. Using unsalted butter gives you control over the overall saltiness of the dish.
- Large Egg: Acts as a binding agent in the crust, helping to hold everything together.
- Vanilla Extract: A touch of vanilla enhances all the other flavors, adding a warm, aromatic note.
- Apples: The star of the show! Firm, tart-sweet apples like Granny Smith, Honeycrisp, Fuji, or Braeburn work best as they hold their shape well during baking and offer a good balance of sweetness and acidity.
- Cinnamon & Nutmeg: These classic warming spices are essential for that quintessential apple pie flavor. They complement the apples beautifully.
- Lemon Juice: A splash of lemon juice prevents the apples from browning and brightens their flavor, making them sing.
- Cornstarch: Used to thicken the apple filling, ensuring it’s jammy and not watery, holding everything together perfectly when sliced.
Step-by-Step Guide to Perfection
Creating these Handmade Apple Pie Bars is a joyful experience. Follow these steps for an effortless bake and a truly delightful result.
1. Prepare Your Crust and Topping (The Clever Part!)
The crust is the foundation, and in this recipe, it cleverly serves double duty as both the base and the crumble topping.
- Combine Dry Ingredients: In a large mixing bowl, whisk together the all-purpose flour and granulated sugar. Make sure there are no lumps.
- Cut in the Butter: Add the cold, cubed unsalted butter to the flour mixture. Using your fingertips, a pastry blender, or a food processor, cut the butter into the flour until the mixture resembles coarse crumbs, with some pea-sized pieces of butter remaining. This step is crucial for achieving a tender, flaky crust.
- Add Wet Ingredients: Lightly beat the large egg with the vanilla extract. Pour this into the flour and butter mixture.
- Form the Dough: Mix until just combined. Be careful not to overmix, as this can lead to a tough crust. The dough will be crumbly but should hold together when squeezed.
- Reserve for Topping: Take about 1 cup (or about one-third) of this dough mixture and set it aside. This will be your delicious crumble topping.
- Press the Base: Press the remaining dough evenly into the bottom of a prepared 9×13 inch baking pan. Make sure to press firmly to form a compact, even layer. You can use the bottom of a glass or your clean hands for this. Place the pan in the refrigerator to chill while you prepare the filling. This helps the crust set and prevents it from shrinking too much during baking.
2. Craft Your Luscious Apple Filling
The heart of these bars is the spiced apple filling.
- Prepare the Apples: Peel, core, and dice your chosen apples into small, uniform pieces. Aim for about ½-inch cubes. This ensures even cooking.
- Combine Filling Ingredients: In a large bowl, toss the diced apples with brown sugar, granulated sugar, cinnamon, nutmeg, lemon juice, and cornstarch.
- Gentle Coating: Mix gently until the apples are thoroughly coated with the spices and sugars. The cornstarch will help to thicken the juices as the bars bake, preventing a watery filling.
3. Assemble and Bake
Now it’s time to bring it all together and let the oven work its magic!
- Preheat Oven: Preheat your oven to 375°F (190°C).
- Pour Filling: Retrieve the chilled crust from the refrigerator. Evenly spread the apple mixture over the prepared crust.
- Add Crumble: Take the reserved crumb mixture and sprinkle it evenly over the apple filling. You can gently press some of the larger clumps together if you like a chunkier crumble.
- Bake: Bake for 40-50 minutes, or until the crumble topping is golden brown and the apple filling is bubbly and tender when pierced with a fork. The exact baking time may vary depending on your oven and the type of apples used.
- Cool Completely: This is the hardest part – patience! Once baked, remove the pan from the oven and let the bars cool completely on a wire rack before slicing. Cooling is essential, as it allows the filling to set properly, ensuring clean, perfect slices. Trying to cut them warm will result in a messy, crumbling bar.
Tips for Success
- Choose the Right Apples: As mentioned, firm, tart-sweet apples work best. A mix of varieties can also add complexity to the flavor.
- Cold Butter is Key: For the crust, always use cold butter. This creates pockets of steam during baking, resulting in a tender, flaky texture.
- Don’t Overmix the Dough: Overmixing develops the gluten in the flour, leading to a tough, dense crust. Mix just until the ingredients are combined.
- Uniform Apple Dicing: Dicing your apples into similar-sized pieces ensures they cook evenly.
- Don’t Skip the Cornstarch: It’s vital for thickening the apple filling. Without it, your bars will be watery.
- Cool Completely: This cannot be stressed enough! Patience is a virtue here. Allowing the bars to cool fully will give you clean, beautiful slices.
- Storage: Store leftover apple pie bars in an airtight container at room temperature for up to 3 days, or in the refrigerator for up to 5 days. They also freeze well for longer storage.
Variations and Enhancements
While these bars are fantastic as is, here are a few ideas to customize them:
- Nutty Crunch: Add 1/2 cup of chopped pecans or walnuts to the crumble topping for an extra layer of texture and flavor.
- Caramel Drizzle: Once the bars have cooled, drizzle them with a homemade or store-bought caramel sauce for an extra touch of decadence.
- Spiced Up: For an even more complex spice profile, add a pinch of ground ginger or allspice to the apple filling.
- Oatmeal Crumble: For a heartier topping, replace half of the flour in the crumble mixture with old-fashioned rolled oats.
- Cream Cheese Swirl: For an extra layer of richness, spread a thin layer of sweetened cream cheese mixture over the bottom crust before adding the apple filling.
Serving Suggestions
These Handmade Apple Pie Bars are delightful on their own, but here are some ways to elevate the experience:
- A La Mode: Serve warm with a scoop of vanilla bean ice cream. The contrast of warm bars and cold ice cream is heavenly.
- Whipped Topping: A dollop of freshly whipped cream adds a light and airy touch.
- Warm Beverage: Pair with a hot cup of coffee, tea, or a glass of cold milk for a comforting treat.
- Breakfast Treat: Yes, these can even be a delightful, albeit indulgent, breakfast or brunch item!
Final Thoughts
These Handmade Apple Pie Bars are more than just a dessert; they’re a testament to the power of simple ingredients coming together to create something truly special. They offer all the warmth and comfort of a classic apple pie without the fuss, making them a perfect addition to any baker’s repertoire. Whether you’re baking them for a special occasion or simply to enjoy a cozy afternoon treat, these bars are sure to bring smiles and satisfy cravings. So, gather your ingredients, preheat your oven, and get ready to fill your home with the irresistible aroma of freshly baked apple pie. Happy baking, and enjoy every comforting bite!
For more delicious recipes and baking inspiration, visit naiyarecipe.com.