Welcome to NaiyaRecipe.com, where we celebrate the joy of home cooking with delicious, accessible recipes that bring warmth and flavor to your table. Today, we’re diving into a culinary adventure that will tantalize your taste buds and perhaps even become a new staple in your kitchen: Savory Pan-Fried Buns with Veggie Noodle Filling. These delightful parcels are a testament to the fact that plant-based meals can be incredibly satisfying, bursting with flavor, and wonderfully comforting.
In a world increasingly seeking healthier and more sustainable food options, these pan-fried buns stand out. They are entirely free of common non-halal ingredients, making them suitable for a wider range of dietary preferences and cultural backgrounds. We’ve crafted this recipe to be not only incredibly delicious but also mindful of ethical and health considerations, ensuring that every bite is pure enjoyment.
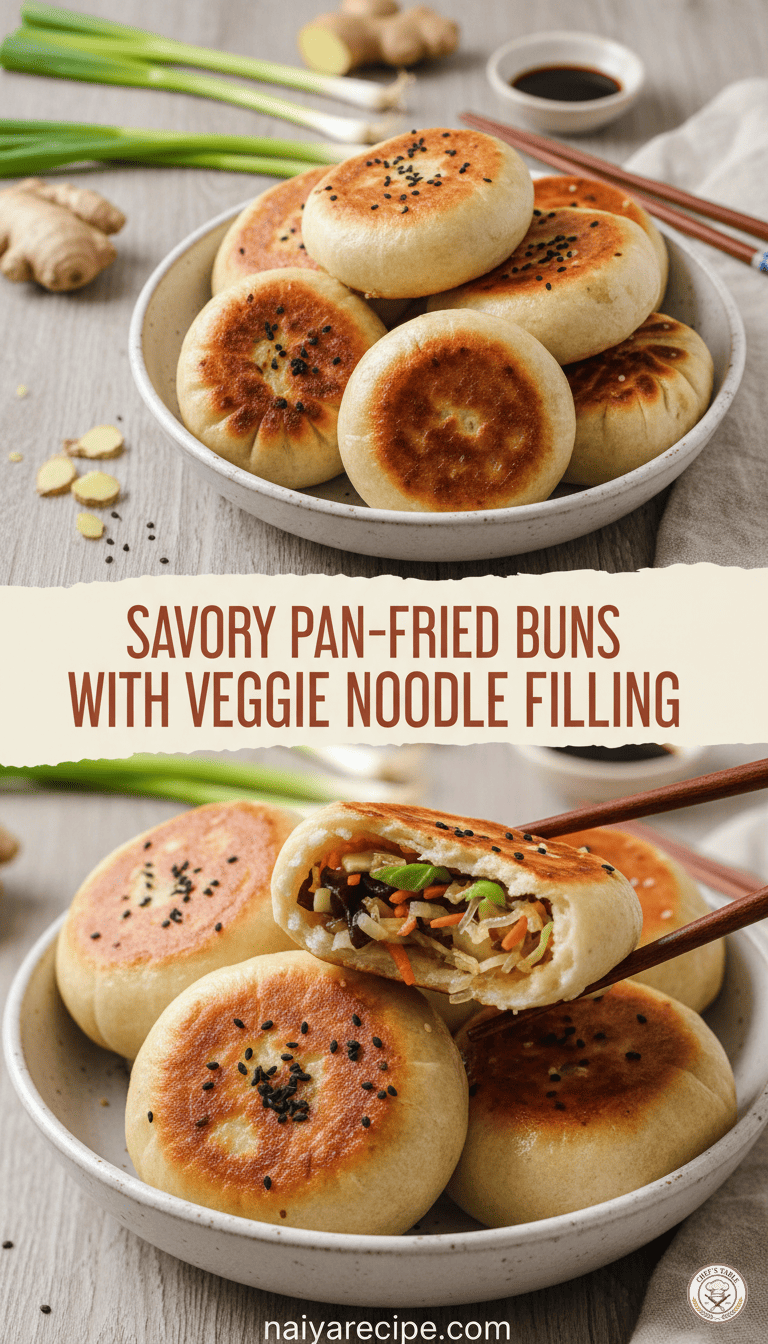
The Allure of Pan-Fried Buns
There’s something uniquely appealing about a pan-fried bun. The exterior, perfectly golden and crisp, gives way to a soft, yielding dough, revealing a treasure trove of savory filling within. It’s a delightful interplay of textures and flavors that captivates from the first bite. Our version elevates this classic with a vibrant, wholesome veggie and noodle filling that is both hearty and incredibly flavorful.
These buns are versatile. They make an excellent appetizer for a gathering, a satisfying lunch, or a light dinner accompanied by a fresh salad. They’re also fantastic for meal prepping; simply make a batch, and you have delicious, ready-to-eat meals for days.
The Heart of the Bun: Our Wholesome Filling
The true star of these buns is undoubtedly the filling. We’ve carefully selected a combination of fresh vegetables and glass noodles to create a harmonious blend of textures and tastes. Imagine tender shredded cabbage, crisp carrots, earthy mushrooms, and aromatic green onions, all tossed with slippery, savory glass noodles. This medley is seasoned to perfection, ensuring every mouthful is packed with umami and freshness.
We’ve focused on creating a filling that is robust and satisfying without relying on any meat products. The vegetables bring natural sweetness and a slight crunch, while the glass noodles absorb the savory sauce beautifully, providing a wonderful chewy texture. This combination ensures that even the most avid meat-eaters will find these buns incredibly satisfying.
Crafting the Perfect Dough
A great bun starts with great dough. Our recipe utilizes a simple yet effective dough that yields a soft, pliable interior and crisps up beautifully when pan-fried. The key is in the kneading and resting, allowing the gluten to develop and the dough to become airy and easy to work with. Don’t be intimidated by making your own dough; it’s a wonderfully tactile and rewarding process. With a little patience, you’ll be shaping perfect buns in no time.
We’ll walk you through each step, from mixing the ingredients to achieving that ideal smooth, elastic dough. The satisfaction of biting into a bun you’ve made from scratch is truly unparalleled.
Ingredients You’ll Need
This recipe calls for readily available ingredients, ensuring you won’t have to embark on a scavenger hunt to gather everything.
For the Dough:
- All-purpose flour: The foundation of our soft buns.
- Warm water: Activates the yeast and brings the dough together.
- Active dry yeast: Our leavening agent for a fluffy texture.
- Sugar: A touch to help activate the yeast and add subtle sweetness.
- Salt: Balances the flavors.
- Vegetable oil: For a tender crumb and to prevent sticking.
For the Veggie Noodle Filling:
- Glass noodles (mung bean vermicelli): These absorb flavors wonderfully and provide a lovely chewy texture.
- Cabbage: Shredded finely for tenderness and sweetness.
- Carrots: Grated or julienned for color, sweetness, and crunch.
- Mushrooms: Shiitake or cremini work beautifully, adding an earthy depth.
- Green onions: For a fresh, pungent aroma and flavor.
- Garlic: Minced, for an aromatic base.
- Ginger: Freshly grated, for a warm, zesty kick.
- Soy sauce: The primary savory seasoning.
- Toasted sesame oil: For its distinctive nutty aroma and flavor.
- Vegetable broth or water: To moisten the filling and enhance flavor.
- Cornstarch slurry (cornstarch mixed with a little water): To thicken the filling slightly.
- Black pepper: To taste.
For Pan-Frying:
- Vegetable oil: For achieving that perfect golden-brown crust.
- Water: To create steam and cook the buns through.
- Sesame seeds (optional): For garnish and added texture.
Step-by-Step Guide to Perfection
Part 1: Preparing the Dough
- Activate the Yeast: In a large mixing bowl, combine the warm water, sugar, and active dry yeast. Stir gently and let it sit for 5-10 minutes, or until foamy. This indicates your yeast is active and ready to work its magic.
- Mix the Dough: Add the flour, salt, and vegetable oil to the yeast mixture. Using a spoon or your hands, mix until a shaggy dough forms.
- Knead the Dough: Transfer the dough to a lightly floured surface. Knead for 8-10 minutes until the dough is smooth, elastic, and no longer sticky. If using a stand mixer with a dough hook, knead on medium speed for about 6-8 minutes.
- First Rise: Lightly grease a clean bowl with a little vegetable oil. Place the dough in the bowl, turning it once to coat. Cover the bowl with a clean kitchen towel or plastic wrap and let it rise in a warm place for 1 to 1.5 hours, or until doubled in size.
Part 2: Crafting the Flavorful Filling
- Prepare Glass Noodles: Soak the glass noodles in hot water for 5-7 minutes, or according to package directions, until softened but still slightly firm. Drain well, then chop them into shorter segments (about 2-3 inches) for easier eating.
- Sauté Aromatics: Heat a tablespoon of vegetable oil in a large skillet or wok over medium heat. Add the minced garlic and grated ginger, and stir-fry for 30 seconds until fragrant.
- Cook Vegetables: Add the shredded cabbage, carrots, and sliced mushrooms to the skillet. Stir-fry for 5-7 minutes until the vegetables are tender-crisp.
- Combine with Noodles: Add the chopped glass noodles to the skillet. Pour in the soy sauce, toasted sesame oil, and vegetable broth. Stir everything together, ensuring the noodles are well coated with the sauce.
- Thicken and Season: Bring the mixture to a gentle simmer. Add the cornstarch slurry and stir continuously until the filling thickens slightly. Stir in the sliced green onions and black pepper. Taste and adjust seasonings as needed. Remove from heat and let the filling cool completely. This is crucial; a hot filling can make the dough difficult to work with.
Part 3: Assembling the Buns
- Divide the Dough: Once the dough has doubled, gently punch it down to release the air. Transfer it to a lightly floured surface and roll it into a log. Divide the log into 12-16 equal pieces, depending on your desired bun size.
- Shape the Wrappers: Take one piece of dough and flatten it into a disc. Using a rolling pin, roll it out into a thin circle, about 4-5 inches in diameter, with the edges slightly thinner than the center.
- Fill and Pleat: Place a generous spoonful of the cooled veggie noodle filling in the center of the dough circle. Bring the edges of the dough up around the filling and pinch them together to form pleats, sealing the bun completely. Ensure there are no gaps. Pinch the top to secure it, or twist gently. If pleating feels too challenging, simply gather the edges and pinch them firmly together to create a sealed pouch.
- Repeat: Place the assembled bun seam-side down on a piece of parchment paper or a lightly floured surface. Repeat with the remaining dough and filling.
Part 4: The Pan-Frying Magic
- Preheat Skillet: Heat 1-2 tablespoons of vegetable oil in a large non-stick skillet over medium heat.
- Arrange Buns: Carefully place the buns seam-side down in the hot skillet, leaving a little space between each bun. Do not overcrowd the pan; cook in batches if necessary.
- Sear the Bottom: Pan-fry for 2-3 minutes, or until the bottoms are golden brown and crispy.
- Steam Cook: Carefully pour about 1/2 cup of water into the skillet (be cautious, as it will sizzle and steam immediately). Immediately cover the skillet with a lid. Reduce the heat to medium-low and steam cook for 8-10 minutes, or until the water has evaporated and the buns are cooked through. The steam will cook the dough and make it soft and fluffy.
- Crisp Again: Once the water has evaporated, remove the lid. If the bottom is no longer crisp, you can increase the heat slightly and cook for another minute or two to re-crisp the bottom to your liking.
- Garnish and Serve: Transfer the pan-fried buns to a serving plate. Garnish with a sprinkle of toasted sesame seeds and fresh chopped green onions if desired.
- Enjoy: Serve immediately with your favorite dipping sauce, such as soy sauce with a dash of rice vinegar and chili oil.
Tips for Success
- Cool the Filling: This cannot be stressed enough. A hot filling will make your dough sticky, tear easily, and be very difficult to work with. Always let the filling cool completely before assembling the buns.
- Don’t Overfill: While it’s tempting to load up on the delicious filling, overfilling can make it difficult to seal the buns properly and may cause them to burst during cooking.
- Even Thickness: Try to roll out your dough wrappers with an even thickness, with slightly thinner edges. This helps create a good seal and prevents the dough from being too thick in some areas.
- Non-Stick Skillet: A good quality non-stick skillet is your best friend for pan-fried buns. It ensures even browning and prevents sticking.
- Patience with Pleating: If you’re new to pleating, practice makes perfect! Don’t get discouraged if your first few aren’t perfect. The taste will be just as amazing regardless of the shape. A simple gather-and-pinch method works just as well.
- Serving Suggestions: These buns are wonderful on their own, but they also pair beautifully with a light soup, a simple cucumber salad, or a side of steamed greens.
Nutritional Benefits
Beyond their incredible taste, these Savory Pan-Fried Buns offer a host of nutritional benefits. They are packed with fiber from the fresh vegetables and whole grains, promoting digestive health. The vegetables also provide an array of vitamins, minerals, and antioxidants essential for overall well-being. Using plant-based ingredients means they are naturally cholesterol-free and lower in saturated fat compared to meat-filled alternatives. This makes them a fantastic option for anyone looking to incorporate more wholesome, plant-forward meals into their diet.
Storage and Reheating
To Store: Leftover pan-fried buns can be stored in an airtight container in the refrigerator for up to 3-4 days.
To Reheat:
- Pan-Frying: The best way to reheat is to lightly pan-fry them again in a little oil until warmed through and the bottoms are re-crisped.
- Steaming: You can also steam them for 5-7 minutes until hot. This will soften the bottom but keep the bun moist.
- Microwave: While convenient, microwaving can sometimes make the dough a bit chewy. If using a microwave, heat for short intervals until warmed through.
A Culinary Journey Awaits
We hope you’re excited to try your hand at making these Savory Pan-Fried Buns with Veggie Noodle Filling. It’s a rewarding culinary experience that results in truly delicious food. This recipe is more than just a meal; it’s an opportunity to create something wonderful with your own hands, sharing warmth and flavor with those you care about.
At NaiyaRecipe.com, we believe that food is a universal language, connecting us through shared experiences and cherished traditions. This recipe is crafted with care, intending to bring a smile to your face and satisfaction to your palate.
So, gather your ingredients, put on your apron, and get ready to embark on a delightful cooking journey. We’re confident that these pan-fried buns will become a beloved addition to your recipe repertoire. Don’t forget to share your creations with us using #NaiyaRecipe! Happy cooking!