Are you ready to explode with flavor? Get ready to experience a taste sensation that combines the beloved classic cheeseburger with the irresistible comfort of a warm, savory roll. Our Savory Garlic & Parmesan Cheeseburger Bombs are here to revolutionize your snack game, appetizer spread, or even a fun weeknight dinner. Imagine biting into a golden, fluffy dough, only to discover a juicy, seasoned ground meat filling perfectly complemented by gooey, melted cheese, all infused with the aromatic punch of garlic and the salty tang of Parmesan. This isn’t just a recipe; it’s an experience waiting to happen in your kitchen.
We’re going to dive deep into every aspect of these delectable bombs, from selecting the finest ingredients to mastering the rolling technique, ensuring your culinary adventure is nothing short of spectacular. So, tie on your apron, preheat your oven, and let’s get ready to make some magic!
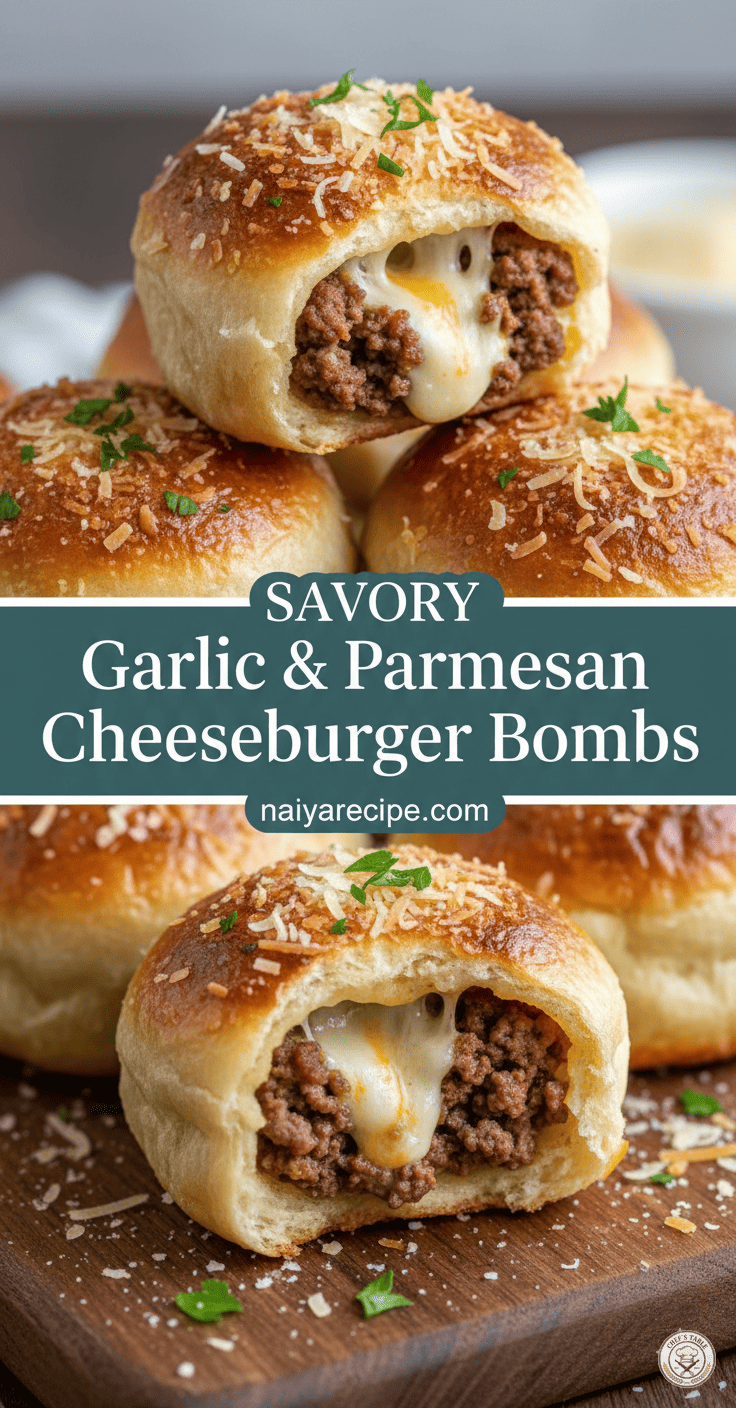
The Anatomy of a Perfect Cheeseburger Bomb
What makes these bombs truly special? It’s the harmonious blend of textures and flavors.
- The Dough: Our base is a simple, yet incredibly versatile, dough that bakes up golden brown and wonderfully soft. It’s the perfect canvas for absorbing all the delicious flavors of the filling. We’ll focus on achieving that ideal light and airy texture without it being too dense.
- The Filling: The heart of our cheeseburger bomb is a well-seasoned ground meat mixture. We’ll explore how to get that classic savory flavor, reminiscent of your favorite burger, without overwhelming the other elements.
- The Cheese: What’s a cheeseburger without cheese? We’re talking about that irresistible, melty, stretchy cheese pull that makes every bite an absolute delight. We’ll discuss the best cheese choices for optimal melt and flavor.
- The Flavor Boosters: Garlic and Parmesan aren’t just afterthoughts; they’re integral to the “savory” in Savory Garlic & Parmesan Cheeseburger Bombs. These ingredients elevate the entire dish, adding depth and an addictive aroma.
Ingredients You’ll Need
To embark on this culinary journey, gather the following high-quality ingredients. Remember, the better your ingredients, the more spectacular your end result will be!
For the Dough:
- 1 cup warm milk (around 105-115°F / 40-46°C)
- 2 ¼ teaspoons active dry yeast (one standard packet)
- 1 tablespoon granulated sugar
- ½ teaspoon salt
- 2 tablespoons unsalted butter, melted
- 3 to 3 ½ cups all-purpose flour, plus more for dusting
- 1 egg, for egg wash
For the Filling:
- 1 tablespoon olive oil
- 1 pound lean ground beef (or ground turkey/chicken for a lighter option)
- ½ cup finely chopped onion
- 2 cloves garlic, minced
- ½ teaspoon salt
- ¼ teaspoon black pepper
- 1 teaspoon dried oregano
- ½ teaspoon smoked paprika (optional, for an extra layer of flavor)
- 2 tablespoons ketchup
- 1 tablespoon mustard (Dijon or yellow, depending on preference)
- 8 ounces cheddar cheese, cut into ½-inch cubes (or a mix of cheddar and mozzarella)
For the Garlic Parmesan Topping:
- 2 tablespoons unsalted butter, melted
- 1 clove garlic, minced very finely
- ¼ cup grated Parmesan cheese
- 2 tablespoons fresh parsley, chopped (for garnish)
Step-by-Step Culinary Adventure
Let’s break down the process into manageable steps, ensuring success even for novice bakers!
Part 1: Crafting the Perfect Dough
The dough is the foundation, so we want it to be light, airy, and flavorful.
- Activate the Yeast: In a large bowl, combine the warm milk, sugar, and active dry yeast. Give it a gentle stir and let it sit for about 5-10 minutes. You’ll know the yeast is active when it becomes foamy and frothy on the surface. This is a crucial step to ensure your dough rises beautifully.
- Combine Wet Ingredients: To the activated yeast mixture, add the salt and melted butter. Stir until well combined.
- Gradually Add Flour: Begin adding the flour, one cup at a time, mixing after each addition. Start with a spoon or a sturdy spatula, and once the dough becomes too stiff to stir, turn it out onto a lightly floured surface.
- Knead the Dough: Knead the dough for about 8-10 minutes. This process develops the gluten, which gives the dough its structure and chewiness. Your goal is a smooth, elastic, and slightly tacky dough. If it’s too sticky, add a little more flour, one tablespoon at a time. If it’s too dry, add a tiny bit of warm water.
- First Rise: Lightly grease a clean bowl with a little olive oil. Place the dough in the bowl, turning it once to coat. Cover the bowl with plastic wrap or a clean kitchen towel and let it rise in a warm place for 1 to 1 ½ hours, or until it has doubled in size. A warm oven (turned off, with just the light on) or a sunny spot on your counter works well.
Part 2: Preparing the Savory Filling
While your dough is rising, let’s get the delicious cheeseburger filling ready.
- Sauté Aromatics: Heat the olive oil in a large skillet over medium heat. Add the finely chopped onion and cook until softened and translucent, about 5-7 minutes.
- Brown the Meat: Add the ground beef (or your chosen ground meat) to the skillet. Break it up with a spoon and cook until it’s fully browned, stirring occasionally.
- Drain Excess Fat: Once the meat is browned, carefully drain any excess fat from the skillet. This prevents your bombs from becoming greasy.
- Season the Filling: Add the minced garlic, salt, black pepper, dried oregano, and smoked paprika (if using) to the browned meat. Stir well and cook for another minute until the garlic is fragrant.
- Add Sauces: Stir in the ketchup and mustard until everything is well combined. Remove the skillet from the heat and let the filling cool slightly. It’s important for the filling to be cool enough to handle before assembling the bombs.
Part 3: Assembling Your Cheeseburger Bombs
This is where the fun really begins! Get ready to transform your dough and filling into irresistible bombs.
- Prepare Work Surface: Once your dough has doubled in size, gently punch it down to release the air. Turn the dough out onto a lightly floured surface.
- Divide the Dough: Divide the dough into 12-16 equal pieces. The size will depend on how large you want your bombs to be. For a good appetizer size, 16 pieces work well.
- Shape the Dough: Take one piece of dough and flatten it into a circle, about 4-5 inches in diameter. You can use a rolling pin or just your fingers. Make sure the edges are slightly thinner than the center.
- Fill with Goodness: Place a spoonful of the cooled ground meat filling in the center of the dough circle. Then, place 2-3 cheese cubes on top of the meat filling. Don’t overfill, or it will be difficult to seal.
- Seal the Bombs: Carefully gather the edges of the dough around the filling, bringing them together at the top. Pinch the seams tightly to seal the bomb completely, ensuring no filling leaks out during baking. Roll the sealed dough lightly between your palms to create a smooth, round ball.
- Arrange on Baking Sheet: Place the sealed bombs, seam-side down, on a baking sheet lined with parchment paper, leaving some space between each bomb.
- Second Rise (Optional but Recommended): Cover the baking sheet loosely with plastic wrap or a clean towel and let the bombs rise for another 20-30 minutes. This short second rise will make them even fluffier.
- Preheat Oven & Egg Wash: While the bombs are having their second rise, preheat your oven to 375°F (190°C). In a small bowl, whisk the egg with 1 tablespoon of water to create an egg wash. Brush the tops of the bombs with the egg wash for a beautiful golden crust.
Part 4: Baking and Finishing Touches
The final stretch to deliciousness!
- Bake the Bombs: Bake the cheeseburger bombs for 18-22 minutes, or until they are golden brown and cooked through. The exact time will depend on your oven and the size of your bombs.
- Prepare Garlic Parmesan Topping: While the bombs are baking, melt the 2 tablespoons of butter in a small microwave-safe bowl. Stir in the minced garlic.
- Brush and Garnish: As soon as the bombs come out of the oven, immediately brush them generously with the melted garlic butter. Then, sprinkle them with the grated Parmesan cheese and fresh chopped parsley. The heat from the bombs will help the butter soak in and the Parmesan to adhere.
Serving Suggestions and Variations
These Savory Garlic & Parmesan Cheeseburger Bombs are incredibly versatile!
- Dipping Sauces: Serve them with your favorite dipping sauces like ketchup, mustard, a special burger sauce, or even a creamy ranch or sriracha mayo for an extra kick.
- Sides: They make a fantastic appetizer alongside a fresh salad, or as a fun main course with a side of sweet potato fries.
- Kid-Friendly: These are a huge hit with kids! They’re easy to hold and packed with flavors they already love.
- Make Ahead: You can prepare the filling a day in advance and store it in the refrigerator. The dough can also be made ahead and stored in the fridge overnight after its first rise. Just bring it to room temperature before shaping.
- Freezing: Once baked and cooled, these bombs freeze beautifully. Wrap them individually in plastic wrap and then place them in a freezer-safe bag. Reheat in the oven or microwave until warmed through.
- Spice It Up: Add a pinch of red pepper flakes to the meat filling for a little heat.
- Cheese Exploration: Experiment with different cheese varieties like pepper jack for a spicy twist, provolone, or even smoked gouda for a gourmet touch.
- Veggie Boost: Finely grate some zucchini or carrots into the meat mixture for a hidden veggie boost. Just make sure to squeeze out any excess moisture from the vegetables before adding them.
The Joy of Homemade
There’s something incredibly satisfying about creating delicious food from scratch, especially when it results in something as crowd-pleasing as these Savory Garlic & Parmesan Cheeseburger Bombs. The aroma filling your kitchen as they bake, the anticipation of that first bite, and the sheer delight of tasting the warm, savory goodness – it’s all part of the culinary journey.
This recipe is designed to be approachable and enjoyable, allowing you to create impressive results without feeling overwhelmed. Whether you’re hosting a party, looking for a creative lunch idea, or simply want to treat yourself and your loved ones to something truly special, these cheeseburger bombs are guaranteed to deliver.
So, go ahead, gather your ingredients, follow these steps, and prepare to impress everyone with your newfound baking prowess. Get ready for an explosion of flavor that will have everyone asking for more! Enjoy the process, savor the aroma, and most importantly, delight in every single bite of your homemade Savory Garlic & Parmesan Cheeseburger Bombs. Happy baking!