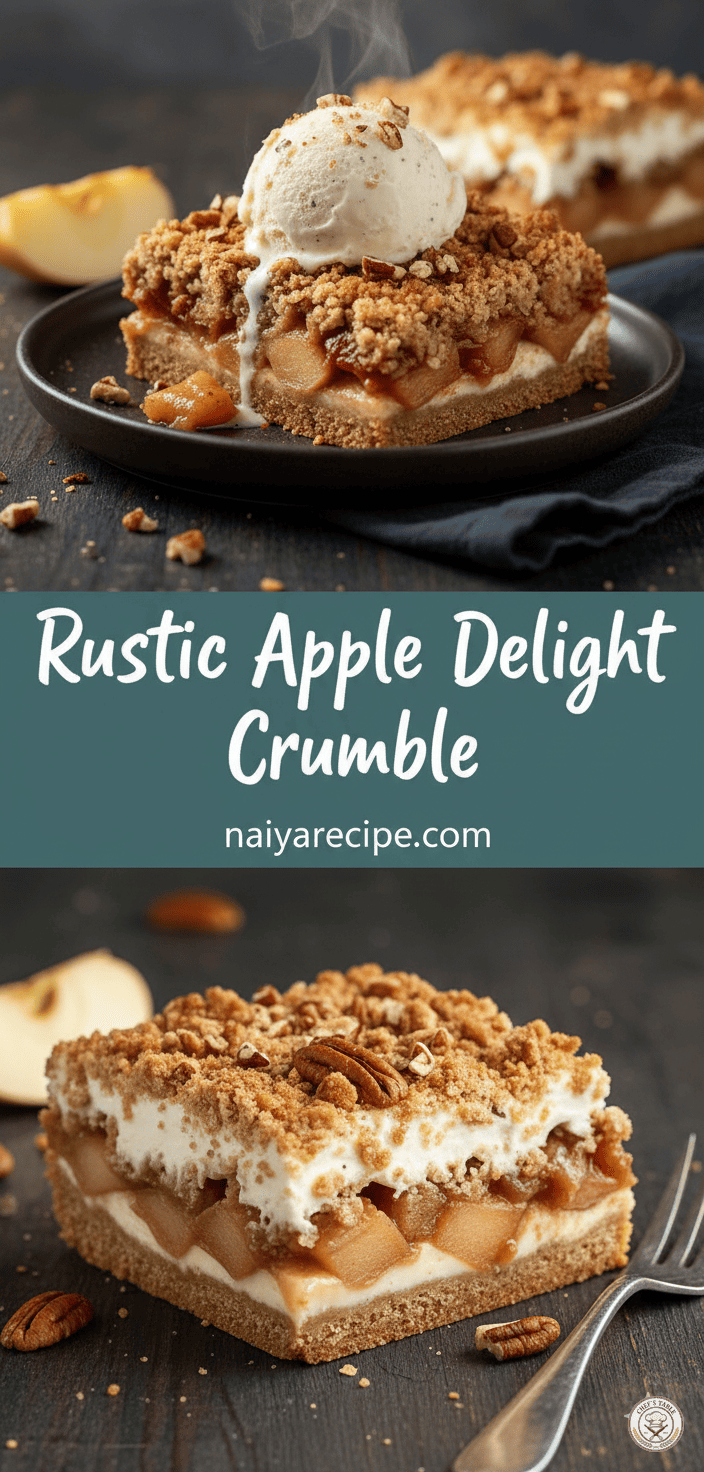
Welcome to NaiyaRecipe.com, where we transform simple ingredients into extraordinary culinary experiences! Today, we’re diving into a dessert that perfectly embodies comfort, warmth, and irresistible flavor: the Rustic Apple Delight Crumble. This isn’t just any apple crumble; it’s a delightful layered creation that brings together the best of a creamy cheesecake, a spiced apple filling, and a buttery, crunchy pecan crumble topping. It’s a dessert that tells a story with every bite, a story of wholesome ingredients coming together in perfect harmony.
The beauty of this Rustic Apple Delight Crumble lies in its approachable elegance. While it looks impressive, it’s surprisingly straightforward to make, making it perfect for both seasoned bakers and those just starting their culinary journey. Imagine serving this at your next family gathering, a cozy autumn evening, or even as a special treat for yourself. The aroma alone will transport you to a place of pure culinary bliss.
The Foundation: A Golden Graham Cracker Crust
Every great dessert needs a solid foundation, and for our Rustic Apple Delight Crumble, we start with a simple yet incredibly flavorful graham cracker crust. This crust provides the perfect counterpoint to the creamy and fruity layers above it, offering a slight crunch and a hint of sweetness that rounds out the entire dessert.
Ingredients for the Crust:
- 1 ½ cups graham cracker crumbs (approximately 10-12 full graham crackers, finely crushed)
- ¼ cup granulated sugar
- ½ cup (1 stick) unsalted butter, melted
Instructions for the Crust:
- Prepare your pan: Lightly grease a 9×13 inch baking dish or a 9-inch springform pan with cooking spray or butter. If using a springform pan, line the bottom with parchment paper for easier removal.
- Combine dry ingredients: In a medium bowl, combine the graham cracker crumbs and granulated sugar. Mix well until evenly distributed.
- Add melted butter: Pour the melted butter over the crumb mixture. Stir with a fork or rubber spatula until all the crumbs are moistened and resemble wet sand.
- Press into the pan: Transfer the crumb mixture to your prepared baking dish or springform pan. Use the back of a spoon or the bottom of a flat-bottomed glass to firmly press the mixture evenly across the bottom and slightly up the sides (if desired, for a firmer edge).
- Chill: Place the crust in the refrigerator to chill for at least 30 minutes while you prepare the other layers. This helps the crust set and prevents it from crumbling too easily when serving.
The Creamy Heart: A Dreamy Cheesecake Layer
Next up is the luscious and tangy cream cheese layer, which adds a wonderful richness and a slight contrast to the sweetness of the apples and crumble. This layer is reminiscent of a no-bake cheesecake, providing a cool, smooth texture that melts in your mouth.
Ingredients for the Creamy Layer:
- 1 (8-ounce) package cream cheese, softened to room temperature
- ½ cup powdered sugar (confectioners’ sugar)
- 1 teaspoon vanilla extract
- 1 cup heavy cream, chilled
Instructions for the Creamy Layer:
- Beat cream cheese: In a large mixing bowl, using an electric mixer, beat the softened cream cheese on medium speed until smooth and creamy, about 2-3 minutes. Make sure there are no lumps.
- Add powdered sugar and vanilla: Gradually add the powdered sugar to the cream cheese, beating until well combined and smooth. Stir in the vanilla extract.
- Whip heavy cream: In a separate, chilled bowl (using a chilled bowl and beaters helps the cream whip faster and firmer), whip the cold heavy cream on high speed until stiff peaks form. Be careful not to over-whip, or it will turn grainy.
- Fold together: Gently fold the whipped cream into the cream cheese mixture in two additions, using a rubber spatula. Fold until just combined, being careful not to deflate the whipped cream.
- Spread over crust: Evenly spread the creamy mixture over the chilled graham cracker crust. Return the pan to the refrigerator to chill further while you prepare the apple filling.
The Star: Spiced Caramelized Apple Filling
No apple crumble is complete without a glorious apple filling! We’re not just using any apples; we’re creating a beautifully spiced, tender, and slightly caramelized apple mixture that will be the true highlight of this dessert. The type of apple you choose can make a difference. Granny Smith apples are excellent for baking as they hold their shape and offer a tartness that balances the sweetness. Honeycrisp, Fuji, or Gala are also great choices for a sweeter, slightly softer texture. A mix of a tart and sweet apple often yields the best results.
Ingredients for the Apple Filling:
- 6 medium-sized apples (about 4-5 cups peeled, cored, and diced), such as Granny Smith, Honeycrisp, or a mix
- ¼ cup unsalted butter
- ½ cup packed light brown sugar
- 1 teaspoon ground cinnamon
- ¼ teaspoon ground nutmeg
- ⅛ teaspoon ground cloves (optional, but adds depth)
- 2 tablespoons water
- 1 tablespoon cornstarch (mixed with 2 tablespoons cold water to create a slurry)
- 1 teaspoon fresh lemon juice (prevents browning and brightens flavor)
Instructions for the Apple Filling:
- Prepare apples: Peel, core, and dice your apples into ½-inch pieces. Try to keep the pieces uniform in size so they cook evenly.
- Sauté apples: In a large skillet or pot over medium heat, melt the butter. Add the diced apples and cook, stirring occasionally, for 5-7 minutes until they start to soften slightly.
- Add spices and sugar: Stir in the brown sugar, cinnamon, nutmeg, and cloves (if using). Add 2 tablespoons of water. Continue to cook, stirring frequently, for another 5-8 minutes, or until the apples are tender but still hold their shape. The sugar will melt and create a syrupy sauce.
- Thicken the sauce: Pour the cornstarch slurry into the apple mixture. Stir constantly for 1-2 minutes until the sauce thickens.
- Add lemon juice: Remove from heat and stir in the fresh lemon juice. This not only brightens the flavor but also helps prevent the apples from browning too much.
- Cool: Allow the apple filling to cool to at least room temperature before spreading it over the creamy layer. This prevents the creamy layer from melting. You can speed up the cooling process by spreading the apples on a baking sheet.
The Crown: Buttery Pecan Crumble Topping
The final touch, and arguably the most satisfying, is the buttery pecan crumble topping. This crumble provides a delightful textural contrast with its crispiness and nutty flavor, perfectly complementing the soft apples and creamy cheesecake.
Ingredients for the Crumble Topping:
- 1 cup all-purpose flour
- ½ cup packed light brown sugar
- ½ cup granulated sugar
- 1 teaspoon ground cinnamon
- ½ cup (1 stick) unsalted butter, cold and cut into small pieces
- 1 cup chopped pecans
Instructions for the Crumble Topping:
- Combine dry ingredients: In a medium bowl, combine the flour, brown sugar, granulated sugar, and cinnamon. Whisk together until well mixed.
- Cut in butter: Add the cold, cubed butter to the dry ingredients. Using your fingertips, a pastry blender, or two knives, cut the butter into the flour mixture until it resembles coarse crumbs. Some larger pea-sized pieces are fine, as they will create pockets of buttery goodness.
- Add pecans: Stir in the chopped pecans until evenly distributed.
Assembly and Baking
Now for the exciting part – bringing all these delicious layers together!
- Layer apples: Once the apple filling has cooled, spoon it carefully and evenly over the chilled cream cheese layer in the baking dish.
- Add crumble: Generously sprinkle the pecan crumble topping over the apple layer, ensuring it covers the entire surface.
- Chill (no-bake option): If you prefer a completely no-bake dessert, you can simply chill the assembled crumble for at least 4 hours, or preferably overnight, to allow all the layers to set firmly. This creates a delightful cold dessert.
- Bake (for a warm crumble): If you prefer a warm crumble with a slightly crispier topping, preheat your oven to 375°F (190°C).
- Place the assembled dish on a baking sheet (to catch any potential drips).
- Bake for 30-35 minutes, or until the crumble topping is golden brown and the apple filling is bubbly around the edges.
- If the topping starts to brown too quickly, you can loosely tent it with aluminum foil.
- Cool (if baked): Once baked, remove from the oven and let it cool on a wire rack for at least 30 minutes before serving. This allows the layers to settle.
Serving Suggestions
The Rustic Apple Delight Crumble is absolutely divine on its own, but here are a few suggestions to elevate your dessert experience:
- A scoop of vanilla bean ice cream: The classic pairing! The cold, creamy ice cream melting over the warm crumble is pure bliss.
- A dollop of freshly whipped cream: Lightens the dessert and adds another layer of creaminess.
- A drizzle of caramel sauce: Enhances the caramelized apple flavor and adds an extra touch of decadence.
- A sprinkle of extra chopped pecans: For an added nutty crunch.
Storage Tips
- Refrigerator: Store any leftover Rustic Apple Delight Crumble in an airtight container in the refrigerator for up to 3-4 days.
- Freezing: While the crust and apple layers can freeze well, the creamy layer might change texture slightly upon thawing. If you plan to freeze, it’s best to assemble and freeze before adding the creamy layer, then add that fresh after thawing. Otherwise, freeze the fully assembled and baked crumble tightly wrapped for up to 1 month. Thaw in the refrigerator overnight.
Why This Crumble Will Be Your New Favorite
This Rustic Apple Delight Crumble isn’t just a dessert; it’s an experience. It combines the comforting flavors of a classic apple pie with the luxurious creaminess of a cheesecake, all topped with a satisfyingly crunchy crumble. It’s the perfect balance of sweet and tangy, soft and crisp, warm and cool.
It’s versatile enough for any occasion, from a casual family dinner to a more formal holiday gathering. The components can even be made ahead of time, making assembly on the day of serving a breeze. Imagine the joy of pulling this golden-brown beauty from the oven, its sweet, spicy aroma filling your home.
At NaiyaRecipe.com, we believe that cooking should be an enjoyable and rewarding journey. This Rustic Apple Delight Crumble is a testament to that philosophy – a recipe that is both accessible to make and absolutely unforgettable to taste. We encourage you to try this recipe, experiment with your favorite apples, and make it your own. Share your creations with us on social media using #NaiyaRecipe and let us know how much you loved this rustic masterpiece! Happy baking!