Welcome to NaiyaRecipe.com, where we transform simple ingredients into extraordinary culinary experiences! Today, we’re diving into the comforting world of baked apples. This classic dessert is a celebration of autumn’s bounty, though its warmth and sweetness are welcome any time of year. Forget complicated techniques and obscure ingredients; our method for baked apples is straightforward, yielding tender, spiced apples brimming with a delightful pecan and caramel topping.
There’s something inherently nostalgic about baked apples. They evoke memories of cozy kitchens, family gatherings, and the sweet aroma of cinnamon wafting through the air. Beyond their sentimental appeal, baked apples are also incredibly versatile. They can serve as an elegant dessert, a hearty breakfast alongside yogurt, or even a wholesome snack. This recipe focuses on maximizing flavor with minimal fuss, ensuring that even novice bakers can achieve spectacular results.
The Perfect Apple: Choosing Your Star Ingredient
The foundation of any great baked apple recipe lies in the apple itself. Not all apples are created equal when it comes to baking. You want an apple that can hold its shape and offer a good balance of sweetness and tartness, without becoming mushy during the baking process.
Here are some of our top recommendations:
- Honeycrisp: A crowd-pleaser for a reason! Honeycrisps are crisp, sweet, and hold their shape beautifully. Their slight tartness provides a wonderful contrast to the sweet filling.
- Fuji: Known for its crisp texture and sweet flavor, Fuji apples are another excellent choice that bakes well without turning to mush.
- Granny Smith: If you prefer a more tart apple, Granny Smiths are ideal. Their firm flesh stands up to baking, and their pucker-factor is perfectly balanced by the sweet topping. You might consider adding a little extra brown sugar to the filling if using these.
- Gala: A good all-around apple, Galas are sweet and have a relatively firm texture that works well in baking.
- Braeburn: These offer a nice sweet-tart balance and maintain their structure when baked.
Pro Tip: Avoid apples like Red Delicious or McIntosh, as they tend to break down too much and become mealy when baked. A firm apple is key to a satisfying baked apple experience.
The Heart of the Matter: Crafting the Irresistible Filling
While the apple provides the structure, the filling is where the magic truly happens. Our recipe features a rich, sweet, and nutty concoction that caramelizes beautifully as it bakes, creating an almost syrupy glaze that coats every bite.
Here’s a breakdown of the key components for our glorious filling:
- Brown Sugar: This is our primary sweetener, offering deep, molasses-rich notes that are far more complex than white sugar. It contributes significantly to the caramel flavor of the topping.
- Rolled Oats: A fantastic addition for texture and a touch of wholesome goodness. They absorb some of the moisture and help create a cohesive, slightly chewy filling.
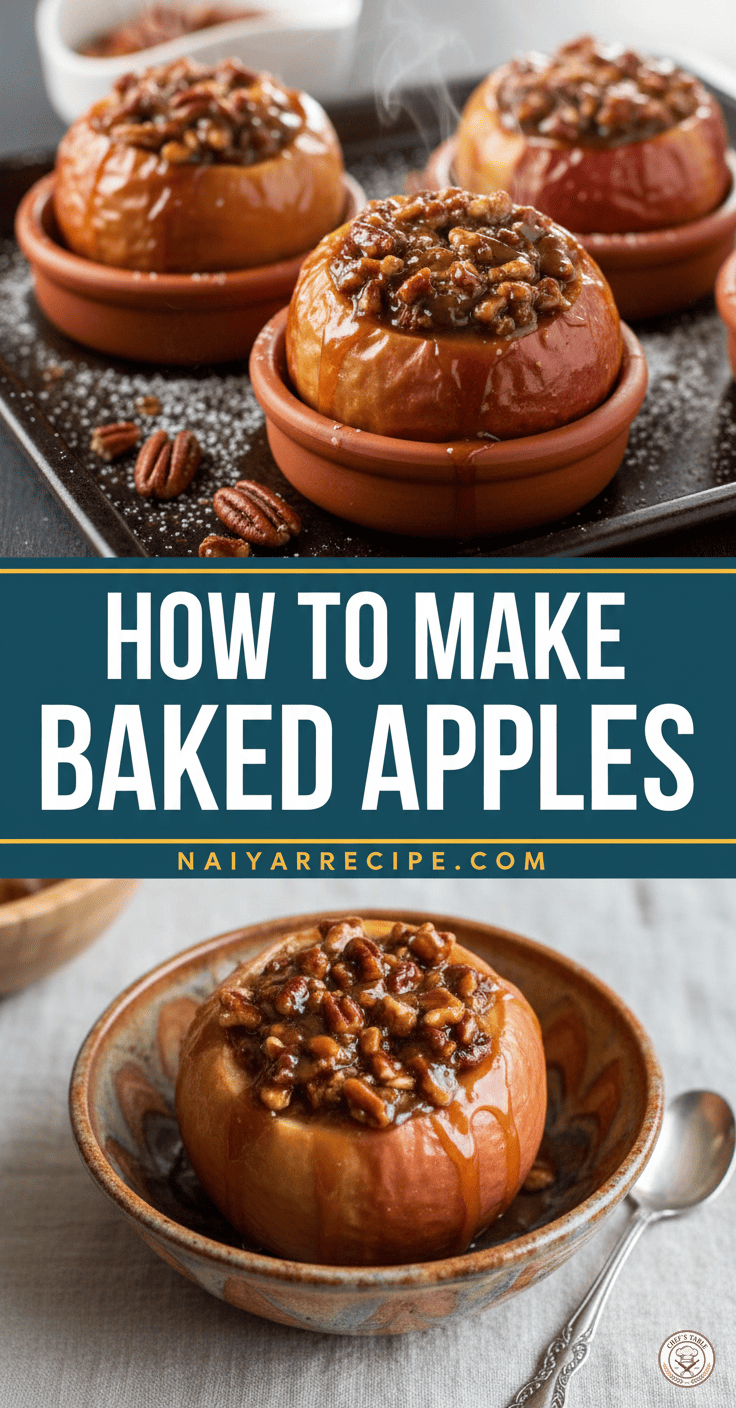
- Pecans: Chopped pecans add a wonderful crunch and a buttery, earthy flavor that complements the apples and sugar perfectly. Toasting them lightly before adding them to the filling can enhance their flavor even further, though it’s not strictly necessary.
- Ground Cinnamon: The quintessential spice for apples! Cinnamon provides warmth, sweetness, and that unmistakable comforting aroma that defines baked apple desserts.
- Ground Nutmeg: A pinch of nutmeg adds another layer of warm spice, enhancing the overall flavor profile without overpowering the cinnamon.
- Unsalted Butter: A crucial ingredient for richness and moisture. The butter melts into the sugar and oats, creating a luscious, gooey filling that caramelizes around the apples.
Flavor Enhancements (Optional):
- A tiny pinch of ground cloves or allspice can add even more depth to the spice blend.
- A spoonful of pure vanilla extract, added to the melted butter, can elevate the overall aroma and taste.
- A tablespoon of dried cranberries or raisins can add a chewy, fruity burst to the filling. Just be sure not to use too much, as they can release a lot of moisture.
The Art of Assembly: Preparing Your Apples for Baking
Preparing the apples is a simple yet satisfying step. The goal is to create a cavity large enough to hold a generous amount of filling while leaving enough apple flesh to maintain its structure.
Step-by-Step Apple Preparation:
- Wash and Dry: Thoroughly wash your apples to remove any dirt or wax, then pat them completely dry.
- Core the Apples: This is the most important step. Using an apple corer or a small paring knife, carefully remove the core from the center of each apple. You want to create a hole that goes almost all the way through to the bottom, but not completely through, leaving about 1/2 to 1/4 inch intact at the base. This acts as a cup for your filling. If you accidentally core all the way through, you can plug the hole with a small piece of apple or foil before filling.
- Enlarge the Cavity (Optional): Depending on the size of your apples and your desired amount of filling, you might want to slightly enlarge the top opening of the cored apple. Use a spoon or paring knife to gently scoop out a little extra flesh from the top rim, creating a wider bowl shape. Be careful not to make the walls too thin.
- Prevent Browning: Once cored, apples can start to brown quickly when exposed to air. You can briefly dip them in a bowl of water with a squeeze of lemon juice, or simply prepare your filling immediately and fill them.
The Baking Process: Transforming Ingredients into a Masterpiece
Baking baked apples is a relatively hands-off process, but a few considerations will ensure perfectly tender, flavorful results.
Preheating and Pan Preparation:
- Preheat your oven to a moderate temperature, usually around 375°F (190°C). This allows the apples to cook through evenly without burning the topping.
- Choose a baking dish that can comfortably hold your apples without crowding them. A pie dish, a square baking dish, or even a rimmed baking sheet will work.
- To prevent sticking and add a little moisture to the pan, you can pour about 1/4 to 1/2 inch of hot water into the bottom of the baking dish. This also creates a steamy environment that helps tenderize the apples.
Filling and Baking:
- Fill Generously: Once the apples are cored, spoon the prepared filling into each cavity, mounding it slightly on top. Don’t be shy; the topping will settle a bit as it bakes.
- Arrange in Dish: Carefully place the filled apples into your prepared baking dish.
- Bake Until Tender: Bake for approximately 35-50 minutes, or until the apples are fork-tender. The baking time will vary depending on the size and variety of your apples. You can check for doneness by gently piercing an apple with a paring knife; it should slide in easily with little resistance. The topping should be bubbly, golden brown, and caramelized.
Covering for Even Cooking (Optional):
If you find that your topping is browning too quickly before the apples are fully cooked, you can loosely tent the baking dish with aluminum foil for the last 15-20 minutes of baking. This protects the topping while allowing the apples to finish cooking.
Serving Suggestions: Enjoying Your Baked Apples
Baked apples are absolutely divine straight from the oven, allowing their aromas to tantalize your senses. However, they are also excellent served at room temperature or even gently reheated.
Here are some serving suggestions to elevate your baked apple experience:
- A La Mode: A scoop of vanilla bean ice cream melting over a warm baked apple is a classic for a reason. The contrast of hot and cold, and the creaminess of the ice cream, is simply irresistible.
- Whipped Cream: A dollop of freshly whipped cream adds a light, airy touch and richness without being too heavy.
- Custard Sauce: A pour of warm custard or crème anglaise turns baked apples into an elegant, restaurant-worthy dessert.
- Yogurt Parfait: For a wholesome breakfast or snack, serve a warm baked apple with a spoonful of Greek yogurt and an extra sprinkle of chopped pecans.
- Plain and Simple: Sometimes, the best way to enjoy a perfectly baked apple is just as it is, allowing the natural sweetness of the fruit and the rich, spiced topping to shine.
Storage and Reheating
If you happen to have any leftover baked apples (a rare occurrence!), they store beautifully.
- Refrigeration: Place cooled baked apples in an airtight container and refrigerate for up to 3-4 days.
- Reheating: To reheat, you can gently warm them in the microwave for a minute or two until heated through, or place them in a preheated oven at 300°F (150°C) for about 10-15 minutes, or until warmed through. Covering them with foil can help prevent them from drying out in the oven.
Baked Apples: More Than Just a Dessert
Baked apples are more than just a sweet treat; they are a culinary hug, a beacon of comfort on a chilly day, and a testament to the simple pleasures of good food. They offer a delightful way to enjoy a wholesome fruit, transformed by warm spices, rich sugars, and crunchy nuts into something truly special.
This recipe from NaiyaRecipe.com is designed to be approachable and adaptable, allowing you to create a personalized dessert that caters to your taste. Whether you’re baking for a special occasion or simply craving a comforting treat, these baked apples are sure to become a cherished addition to your recipe repertoire. So, gather your ingredients, preheat your oven, and prepare to fill your kitchen with the irresistible aroma of homemade baked apples. Enjoy every delicious bite!