Welcome, fellow food enthusiasts, to a journey into the heart of comfort and the sweet embrace of homemade goodness! Today, we’re diving into the delightful world of Handmade Apple Crescents – a recipe that promises to fill your kitchen with an irresistible aroma and your belly with pure joy. These aren’t just any apple pastries; they’re little pockets of warmth, each one a testament to the simple pleasures of baking from scratch.
The Allure of the Apple Crescent
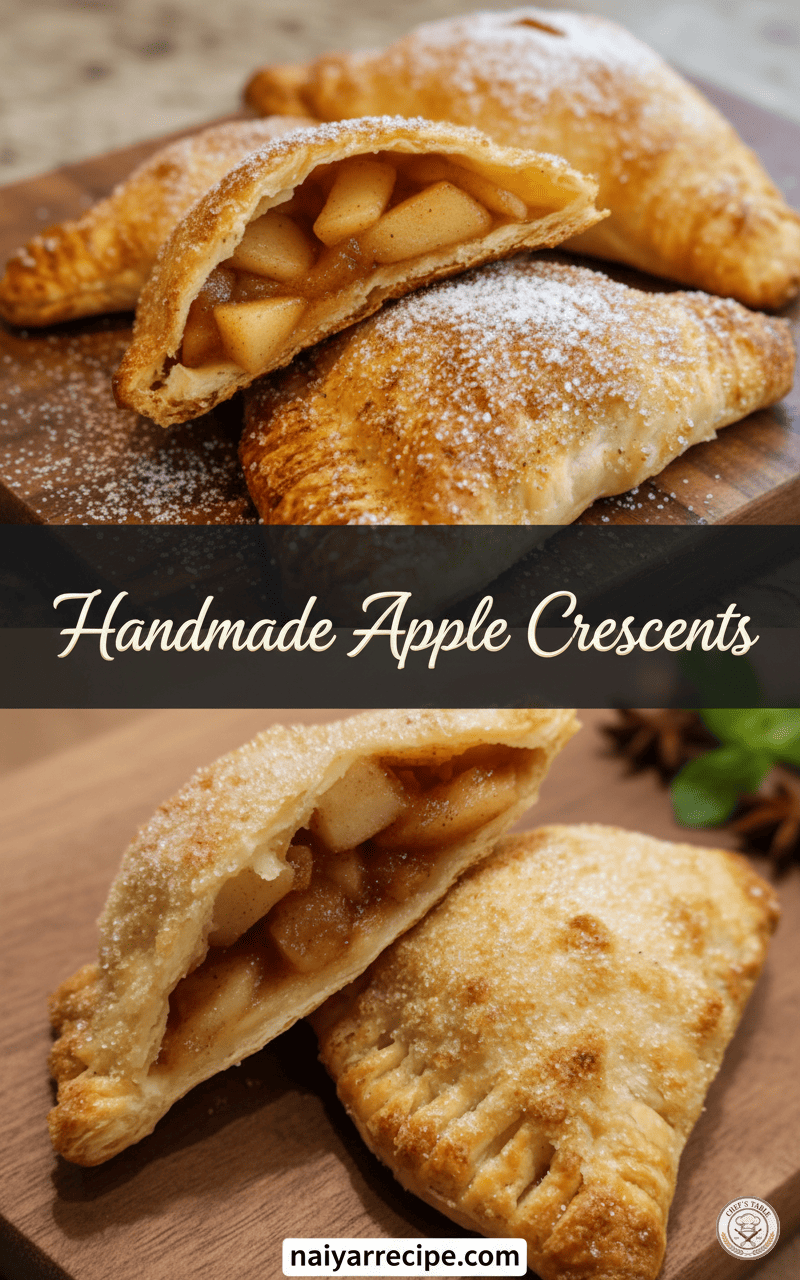
There’s something inherently magical about an apple dessert. It evokes memories of crisp autumn days, cozy evenings, and the comforting feeling of home. Our Handmade Apple Crescents take that classic appeal and elevate it, offering a personal touch that store-bought versions simply can’t replicate. Imagine flaky, golden-brown pastry, lightly dusted with a shimmering coat of sugar, giving way to a warm, spiced apple filling that’s perfectly tender and bursting with flavor. Every bite is a harmonious blend of textures and tastes – the delicate crunch of the crust, the soft sweetness of the apples, and the subtle warmth of cinnamon and nutmeg.
These crescents are incredibly versatile. They make for a perfect breakfast pastry, a delightful afternoon snack with a cup of tea, or a charming dessert that’s sure to impress your guests. And the best part? While they look elegant and sophisticated, they are surprisingly straightforward to make.
Why “Handmade” Makes All the Difference
In a world filled with shortcuts and ready-made options, taking the time to create something by hand is a truly rewarding experience. “Handmade” in this recipe isn’t just a descriptor; it’s an ethos. It signifies the care, the attention, and the love that goes into every single crescent. From rolling out the dough to carefully crimping the edges, each step is an opportunity to connect with your food and appreciate the process of creation.
The beauty of handmade pastries lies in their imperfections – each one slightly unique, telling its own story. These aren’t factory-produced uniform pieces; they are crafted with human hands, imbued with warmth and character. This personal touch is what elevates them from mere pastries to truly special treats that will be cherished by anyone lucky enough to taste them.
The Star Ingredient: Apples!
Choosing the right apples is crucial for the success of your crescents. While many varieties work well, certain types hold their shape better during baking and offer a good balance of sweetness and tartness.
- Granny Smith: A classic choice for baking due to its firm texture and tartness, which beautifully cuts through the sweetness of the sugar and spices.
- Honeycrisp: Offers a wonderful crunch and a sweet-tart flavor that’s beloved by many.
- Fuji: Sweet and crisp, Fujis maintain their texture well.
- Gala: A milder, sweeter option that still bakes nicely.
A good approach is often to use a combination of apples – perhaps a tart Granny Smith paired with a sweeter Honeycrisp or Fuji – to create a more complex flavor profile in your filling. No matter your choice, ensure your apples are fresh, firm, and free of blemishes.
Essential Tools for Success
You don’t need a professional pastry kitchen to make these crescents. A few basic tools will get you started:
- Rolling Pin: Essential for achieving an even dough thickness.
- Large Mixing Bowl: For combining your filling ingredients.
- Measuring Cups and Spoons: Accuracy is key in baking.
- Pastry Cutter or Knife: For dividing the dough.
- Baking Sheets: Lined with parchment paper for easy cleanup and to prevent sticking.
- Fork: For crimping the edges of your crescents.
- Pastry Brush: Optional, but useful for applying an egg wash or melted butter.
Crafting the Perfect Pastry Dough
The foundation of a great apple crescent is a flaky, tender pastry dough. While you can certainly use store-bought puff pastry or pie crust dough for convenience, making your own from scratch is a rewarding experience and allows you to control the ingredients.
For a simple, delicious pastry dough:
- Flour Power: Start with good quality all-purpose flour.
- Cold Fat: The secret to flaky pastry is using very cold unsalted butter, cut into small cubes. Some recipes might also incorporate vegetable shortening for an even flakier result.
- Ice Water: Just like the fat, the water needs to be ice cold. This helps prevent the butter from melting prematurely and keeps the dough tender.
- A Pinch of Salt: Enhances the flavor of the dough.
The key to working with pastry dough is to handle it as little as possible. Overworking the dough develops gluten, which can lead to a tough crust. Mix just until the ingredients are combined, then chill the dough thoroughly before rolling it out. This chilling period is crucial as it allows the gluten to relax, making the dough easier to handle and resulting in a more tender pastry.
The Heart of the Crescent: Spiced Apple Filling
Now for the star of the show: the apple filling! This is where the magic truly happens, transforming simple apples into a warm, fragrant delight.
Ingredients for the filling:
- Fresh Apples: Peeled, cored, and finely diced. Dicing them small ensures they cook evenly and fit nicely into your crescents.
- Brown Sugar: Adds a rich, caramelized sweetness. You can adjust the amount based on the sweetness of your apples and your personal preference.
- Cinnamon: The quintessential apple spice.
- Nutmeg: A warm, earthy complement to cinnamon.
- A Touch of Lemon Juice: A squeeze of fresh lemon juice brightens the flavors and prevents the apples from browning.
- Cornstarch or Flour: A small amount helps to thicken the juices released by the apples during baking, preventing a soggy pastry.
Preparation of the filling:
- Combine the diced apples with brown sugar, cinnamon, nutmeg, and lemon juice in a bowl. Toss gently to coat.
- Sprinkle in the cornstarch or flour and mix well. This will ensure your filling sets nicely and doesn’t make your pastry mushy.
- Let the mixture sit for about 10-15 minutes. This allows the apples to release some of their juices, which will then combine with the sugar and spices to form a delicious syrup during baking.
Assembling Your Crescents: A Step-by-Step Guide
This is where your crescents begin to take shape!
- Prepare Your Work Surface: Lightly flour a clean, dry surface.
- Roll Out the Dough: Take a portion of your chilled dough and roll it out into a thin circle, about 1/8 to 1/4 inch thick. The size of your circle will depend on how large you want your crescents to be. For standard-sized crescents, a 10-12 inch circle works well.
- Cut the Dough: Using a pastry cutter or a sharp knife, cut the circle into wedges, like slicing a pizza. Aim for 6-8 wedges per circle, depending on your desired crescent size.
- Fill Each Wedge: Place a spoonful of the apple filling near the wider end of each dough wedge. Don’t overfill, or it will be difficult to seal.
- Fold and Roll: Gently fold the pointed end of the dough over the filling. Starting from the wider end, carefully roll the dough towards the narrow point, creating the crescent shape.
- Seal the Edges: Once rolled, lightly press down on the edges of the crescent. Then, use the tines of a fork to crimp and seal the edges firmly. This prevents the filling from leaking out during baking and adds a lovely decorative touch.
- Egg Wash (Optional but Recommended): For a beautiful golden-brown sheen, whisk one egg with a tablespoon of water to create an egg wash. Brush this mixture lightly over the tops of your crescents.
- Sugar Sparkle: Before baking, sprinkle a generous amount of granulated sugar over the egg-washed crescents. This creates that delicious, slightly crunchy, sugary crust.
- Prepare for Baking: Arrange the assembled crescents on a baking sheet lined with parchment paper, leaving some space between each one.
Baking to Golden Perfection
Preheat your oven to the recommended temperature (typically around 375°F or 190°C). Bake the crescents for approximately 20-25 minutes, or until they are puffed up, golden brown, and the filling is bubbling. The exact baking time may vary depending on your oven and the size of your crescents. Keep an eye on them, as you want them perfectly golden, not burnt.
Once baked, transfer the crescents to a wire rack to cool slightly. While they are tempting to devour immediately, giving them a few minutes to cool allows the filling to set and prevents any unfortunate burns!
Serving Suggestions and Variations
Handmade Apple Crescents are wonderful on their own, but here are a few ideas to elevate your serving experience:
- A Dusting of Powdered Sugar: For an extra touch of elegance, dust the cooled crescents with powdered sugar before serving.
- A Scoop of Ice Cream: A warm crescent with a scoop of vanilla bean ice cream is a match made in dessert heaven.
- A Dollop of Whipped Cream: Light and airy whipped cream adds a lovely creamy contrast.
- Caramel Drizzle: A light drizzle of warm caramel sauce takes these to an indulgent new level.
- Fruit Accompaniment: Serve alongside fresh berries or a light fruit salad for a balanced treat.
Variations to explore:
- Spice It Up: Experiment with other warm spices like cardamom or a tiny pinch of ginger in your apple filling.
- Nutty Addition: Fold in a handful of finely chopped pecans or walnuts into the apple filling for added texture and flavor.
- Different Fruits: While these are apple crescents, the concept can be adapted for other fruits! Try peach, cherry, or mixed berry fillings (adjusting sugar and thickener as needed).
- Glaze: Instead of just sugar, you could make a simple glaze with powdered sugar and a touch of milk or lemon juice to drizzle over the cooled crescents.
Storing Your Handmade Apple Crescents
If you happen to have any leftovers (a rare occurrence, we predict!), store them in an airtight container at room temperature for up to 2-3 days. For longer storage, you can refrigerate them for up to a week. To reheat, simply pop them in a warm oven for a few minutes to crisp up the pastry.
You can also freeze unbaked crescents! Arrange them on a baking sheet and freeze until solid, then transfer them to a freezer-safe bag. When you’re ready to bake, you can bake them from frozen, adding a few extra minutes to the baking time.
The Joy of Baking and Sharing
Baking Handmade Apple Crescents is more than just following a recipe; it’s an experience. It’s the comforting rhythm of rolling dough, the intoxicating scent of apples and cinnamon filling your home, and the pure satisfaction of sharing something delicious that you’ve created with your own hands.
These crescents are perfect for any occasion – a quiet morning indulgence, a festive gathering, or a thoughtful gift for a friend or neighbor. They embody comfort, warmth, and the simple joy of good food. So, gather your ingredients, clear your counter, and embark on this delightful baking adventure. Your taste buds (and everyone around you!) will thank you. Happy baking!
naiyarecipe.com