There are some dishes that just speak to the soul, and for many, chicken pot pie is at the top of that list. It’s a warm hug on a cold day, a celebration of simple, wholesome ingredients, and a truly satisfying meal that brings everyone to the table. But not all chicken pot pies are created equal. Today, we’re diving into a recipe that takes this classic to new heights: the Fail-Proof Roasted Garlic Chicken Pot Pie. This isn’t just any pot pie; it’s a dish designed for ultimate comfort, bursting with flavor, and surprisingly achievable for even the most hesitant home cook. Get ready to impress your family and friends with this ultimate weekend comfort meal.
The Magic of Roasted Garlic
What sets this particular chicken pot pie apart is the inclusion of roasted garlic. If you’ve never roasted garlic before, prepare to have your mind blown. Roasting garlic transforms its pungent, sharp flavor into something incredibly sweet, nutty, and mellow. It becomes spreadable, almost creamy, and imparts an unparalleled depth of flavor to any dish it graces. In this pot pie, the roasted garlic infuses the entire filling with a subtle warmth and richness that elevates every bite. It’s a game-changer, turning a good pot pie into an extraordinary one.
Why “Fail-Proof”?
The term “fail-proof” might sound too good to be true when it comes to cooking, but we stand by it for this recipe. We’ve designed this recipe with clear, easy-to-follow steps and practical tips to ensure your success. From perfectly cooked chicken to a rich, creamy filling that won’t be too runny or too thick, and a golden, flaky crust that’s a joy to behold – we’ve got you covered. Even if you’re a novice baker or a seasoned pro looking for a reliable recipe, this one is built for success.
Ingredients You’ll Need
Let’s gather our components for this magnificent meal. The beauty of chicken pot pie lies in its use of readily available ingredients, and this recipe is no exception.
For the Filling:
- Chicken: 2 pounds boneless, skinless chicken breasts or thighs, cut into 1-inch cubes. Using a mix of both can add even more flavor and texture.
- Aromatics: 1 large yellow onion, chopped; 2 ribs celery, chopped.
- Roasted Garlic: 1 head of garlic, roasted (see instructions below). This is the star ingredient!
- Vegetables: 1.5 cups frozen peas; 1.5 cups frozen diced carrots (or fresh, blanched carrots); 1 cup diced potatoes (Yukon Gold or Russet work well).
- Fats: 6 tablespoons unsalted butter.
- Thickener: 1/2 cup all-purpose flour.
- Liquids: 4 cups low-sodium chicken broth; 1 cup whole milk (or half-and-half for extra richness).
- Seasoning: 1 teaspoon dried thyme; 1/2 teaspoon dried rosemary (crushed); salt and freshly ground black pepper to taste; a pinch of nutmeg (optional, but highly recommended for depth).
- Fresh Herbs for Garnish: Fresh parsley or chives, chopped.
For the Crust:
- Puff Pastry: 2 sheets store-bought puff pastry, thawed according to package directions. This is our secret weapon for a truly fail-proof, flaky crust! Alternatively, you can use your favorite pie crust recipe for a double-crust pie.
- Egg Wash: 1 egg, beaten with 1 tablespoon water (for brushing the crust).
Step-by-Step: Crafting Your Comfort Masterpiece
Part 1: Roasting the Garlic (Do This First!)
- Prepare the Garlic: Preheat your oven to 400°F (200°C). Take one whole head of garlic. Do not peel it. Simply slice off the very top (about 1/4 inch) of the head, exposing the tops of the cloves.
- Season and Wrap: Drizzle the exposed garlic cloves with about 1 teaspoon of olive oil. Season lightly with salt and pepper.
- Roast: Wrap the garlic head loosely in aluminum foil, creating a small packet. Place it directly on the oven rack or on a small baking sheet.
- Bake: Roast for 30-40 minutes, or until the cloves are very soft and golden brown. Let cool slightly.
- Extract: Once cool enough to handle, gently squeeze the bottom of the garlic head to release the softened, sweet garlic paste. Mash it with a fork. Set aside.
Part 2: Preparing the Filling
- Cook the Chicken: In a large pot or Dutch oven, melt 2 tablespoons of butter over medium-high heat. Add the cubed chicken and cook until lightly browned on all sides and cooked through, about 5-7 minutes. Remove the chicken from the pot and set aside.
- Sauté Aromatics: Add another 2 tablespoons of butter to the same pot. Add the chopped onion and celery. Cook over medium heat, stirring occasionally, until softened, about 5-8 minutes.
- Add Potatoes: Stir in the diced potatoes and cook for another 5 minutes, stirring occasionally.
- Create the Roux: Add the remaining 2 tablespoons of butter to the pot and let it melt. Sprinkle the flour over the vegetables and stir constantly for 1-2 minutes. This mixture is called a roux, and it will thicken our pot pie filling.
- Build the Sauce: Gradually whisk in the chicken broth, a little at a time, making sure to scrape up any browned bits from the bottom of the pot. Continue whisking until the mixture is smooth and begins to thicken.
- Add Dairy and Seasonings: Stir in the milk, dried thyme, dried rosemary, and the mashed roasted garlic. Bring the mixture to a gentle simmer, stirring frequently, until it thickens further.
- Combine Ingredients: Return the cooked chicken to the pot. Add the frozen peas and carrots. Season generously with salt, freshly ground black pepper, and the pinch of nutmeg (if using). Stir well to combine all ingredients. Taste and adjust seasoning as needed.
- Cool Slightly: Remove the filling from the heat and let it cool for about 15-20 minutes. This step is important to prevent the puff pastry from becoming soggy.
Part 3: Assembling and Baking the Pot Pie
- Preheat Oven & Prepare Dish: Preheat your oven to 400°F (200°C). Lightly grease a 9×13 inch baking dish or individual ramekins/pie dishes.
- Fill the Dish: Pour the slightly cooled chicken pot pie filling into your prepared baking dish(es).
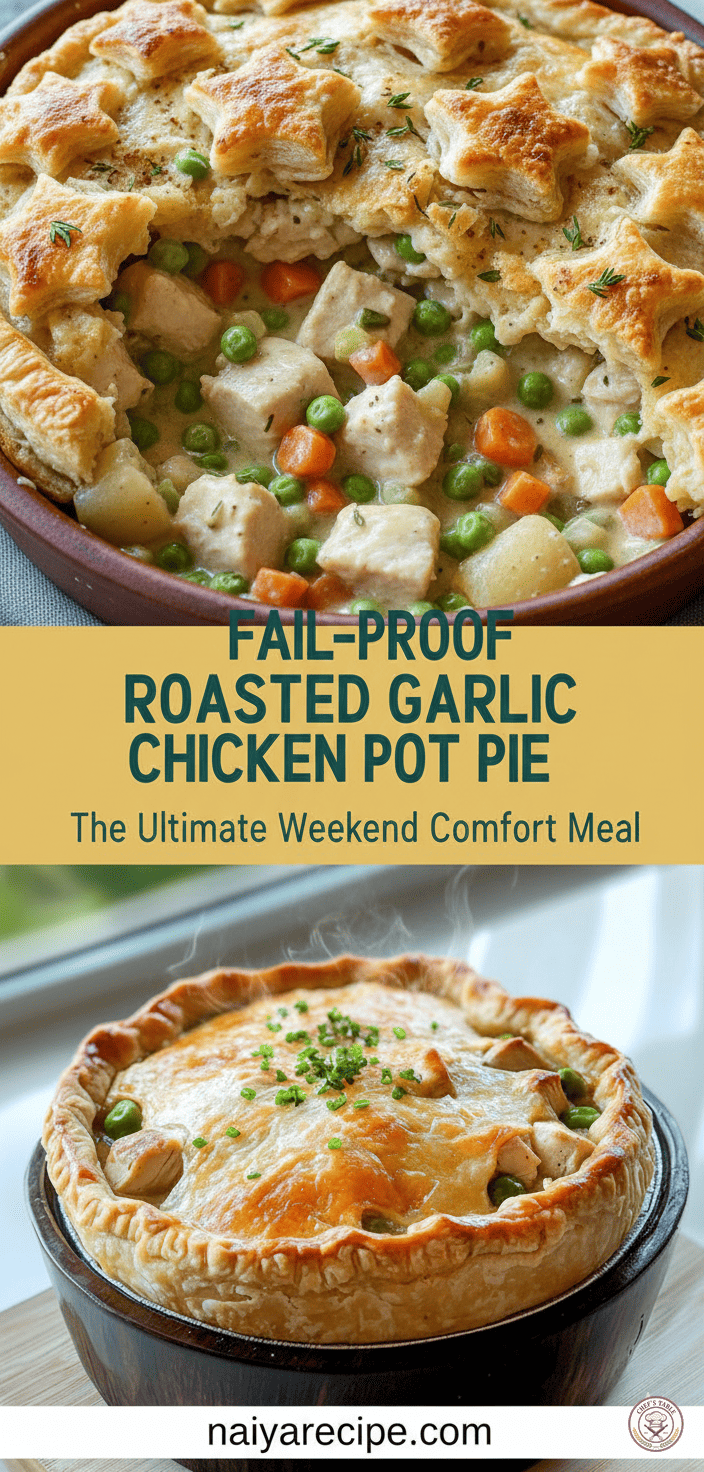
- Prepare the Crust: On a lightly floured surface, gently unroll your thawed puff pastry sheets. You may need to gently roll them out slightly to fit your dish. If using individual ramekins, cut the puff pastry into shapes that will cover each dish with a slight overhang. For the main image inspiration, we used star cutouts from puff pastry, which is a fantastic way to add visual appeal. You can cut out shapes and place them decoratively, or simply cover the entire dish with a single sheet.
- Cover the Filling: Carefully lay the puff pastry over the filling, crimping the edges to seal it to the dish (if using a full sheet). If using cutouts, arrange them over the top. If desired, cut a few small slits in the top of a full sheet of pastry to allow steam to escape.
- Egg Wash: In a small bowl, beat one egg with 1 tablespoon of water to create an egg wash. Lightly brush the top of the puff pastry with the egg wash. This will give it a beautiful golden-brown shine.
- Bake: Place the pot pie on a baking sheet (to catch any potential drips). Bake for 30-40 minutes, or until the crust is golden brown and flaky, and the filling is bubbly. If the crust starts to brown too quickly, you can loosely tent it with aluminum foil.
- Rest and Serve: Once baked, remove the pot pie from the oven and let it rest for 10-15 minutes before serving. This allows the filling to set and prevents it from being too runny. Garnish with fresh chopped parsley or chives.
Tips for Pot Pie Perfection
- Don’t Overcook the Chicken Initially: The chicken will continue to cook in the filling, so aim for just cooked through when you first sauté it. This prevents dry chicken.
- Cool the Filling: This is crucial! Placing hot filling directly under puff pastry can make the bottom crust soggy.
- Puff Pastry Shortcut: Don’t hesitate to use store-bought puff pastry. It’s a fantastic shortcut that delivers incredible results – super flaky and delicious! For an extra touch, use cookie cutters to make decorative shapes like stars or leaves to place on top.
- Make Ahead: The filling can be made a day or two in advance and stored in the refrigerator. Assemble and bake just before serving for the freshest crust.
- Freezing: You can freeze unbaked pot pies for a quick meal later. Assemble the pie in an oven-safe dish, cover tightly with foil, and freeze for up to 3 months. When ready to bake, thaw overnight in the refrigerator, then bake as directed (you might need to add a few extra minutes).
- Vegetable Variations: Feel free to customize the vegetables based on what you have or prefer. Green beans, corn, mushrooms, or sweet potatoes would all be delicious additions. Just be sure to pre-cook any harder vegetables slightly before adding them to the filling.
- Herbs: Don’t be shy with fresh herbs. A sprinkle of fresh thyme or rosemary at the end can brighten the flavors beautifully.
Serving Suggestions
This Fail-Proof Roasted Garlic Chicken Pot Pie is a meal in itself, but it pairs wonderfully with a simple side salad dressed with a light vinaigrette. The freshness of the salad cuts through the richness of the pot pie perfectly. A side of steamed green vegetables, such as asparagus or broccoli, would also be a great accompaniment.
The Joy of Homemade Comfort
There’s something incredibly rewarding about serving a homemade meal that truly warms the heart and soul. This Fail-Proof Roasted Garlic Chicken Pot Pie is more than just a recipe; it’s an invitation to create lasting memories around your dinner table. The aroma alone will draw everyone into the kitchen, and the first bite will confirm that all the effort was more than worth it.
So, gather your ingredients, follow these steps, and prepare to bask in the glory of truly ultimate comfort food. This weekend, let the magic of roasted garlic transform your kitchen into a haven of deliciousness. Happy cooking!
Find more delicious and comforting recipes at naiyarecipe.com.