Welcome, food lovers, to a journey into the heart of comfort food: Creamy Garlic Chicken. This dish isn’t just a meal; it’s an experience, a warm hug on a plate, and a guaranteed crowd-pleaser. If you’re searching for a recipe that combines rich flavors, tender chicken, and a luscious sauce, look no further. This detailed guide will walk you through every step, ensuring your homemade Garlic Chicken turns out perfectly every time.
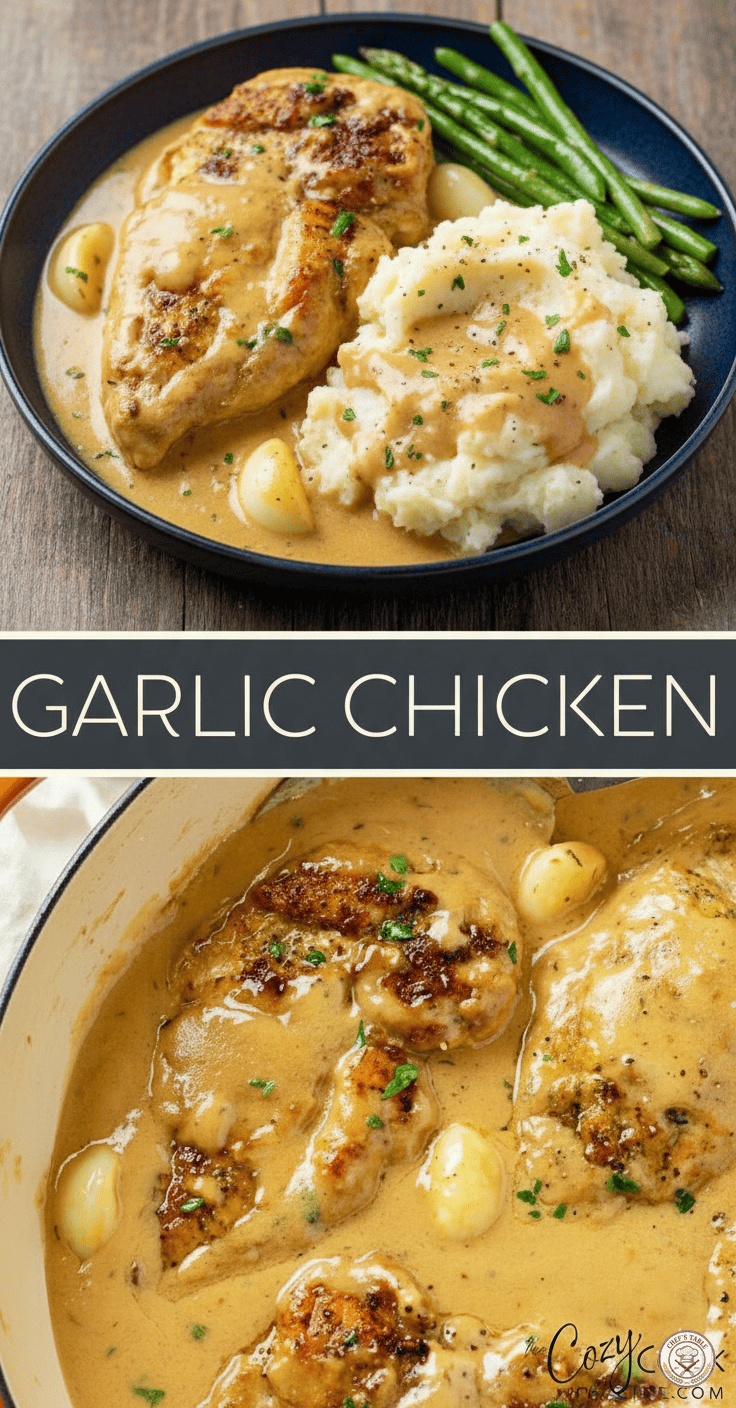
The beauty of Creamy Garlic Chicken lies in its simplicity and the depth of flavor it achieves with humble ingredients. Imagine golden-brown chicken breasts, seared to perfection, then bathed in a velvety, aromatic garlic sauce. Served alongside fluffy mashed potatoes and crisp green beans, it’s a symphony of textures and tastes that will leave everyone at your table asking for seconds.
This recipe is incredibly versatile and perfect for a weeknight family dinner or an elegant meal for guests. It’s hearty, satisfying, and undeniably delicious. So, tie on your apron, gather your ingredients, and let’s dive into creating this culinary masterpiece!
Why This Garlic Chicken Recipe Will Become Your New Favorite
There are countless reasons why this Creamy Garlic Chicken stands out.
- Incredible Flavor: The star, of course, is the garlic. We’re talking about a generous amount, which mellows and sweetens as it cooks, infusing the sauce with an irresistible aroma and taste.
- Tender, Juicy Chicken: The chicken is seared first to develop a beautiful crust and lock in juices, then finished in the sauce, resulting in incredibly tender and moist meat.
- Rich, Velvety Sauce: The creamy sauce is truly the soul of this dish. It’s thick enough to cling to the chicken and potatoes, boasting a luxurious texture and savory depth.
- Simple Yet Impressive: Despite its gourmet taste, this recipe is surprisingly straightforward, making it accessible for cooks of all skill levels.
- Customizable: While perfect as is, it’s also a fantastic base for adding your favorite herbs or vegetables.
- Family-Friendly: It’s a dish that appeals to almost everyone, even picky eaters, making dinner time a breeze.
The Essential Ingredients: Quality Matters
While the ingredient list is straightforward, using fresh, good-quality components will elevate your dish.
For the Chicken:
- Chicken Breasts: Boneless, skinless chicken breasts are ideal here. Aim for evenly sized pieces to ensure they cook at the same rate. You can also use boneless, skinless chicken thighs if you prefer darker meat; just adjust cooking times slightly.
- Olive Oil: For searing the chicken and building the base of our sauce.
- Salt and Freshly Ground Black Pepper: Essential seasonings to bring out the chicken’s natural flavors.
- Garlic Powder (optional): A little extra garlic punch for the chicken itself.
For the Creamy Garlic Sauce:
- Garlic: This is non-negotiable! Fresh garlic cloves, minced, are paramount. Don’t skimp here – the more the merrier!
- Unsalted Butter: Adds richness and helps create that beautiful roux for the sauce.
- All-Purpose Flour: A small amount of flour helps to thicken the sauce, giving it that luxurious, velvety consistency.
- Chicken Broth/Stock: Use a good quality, low-sodium chicken broth to control the saltiness of the dish. This forms the liquid base of our sauce.
- Heavy Cream: This is where the magic happens for creaminess. Don’t substitute with half-and-half or milk if you want that truly decadent sauce.
- Dried Italian Seasoning (or dried oregano/thyme): Adds an aromatic, herbaceous note to the sauce.
- Fresh Parsley (for garnish): Brightens up the dish visually and adds a fresh, herbaceous finish.
Recommended Sides:
- Mashed Potatoes: The ultimate companion for soaking up every last drop of that amazing sauce.
- Green Beans or Asparagus: Provides a lovely fresh, slightly crisp contrast to the richness of the chicken and sauce.
Step-by-Step: Crafting Your Creamy Garlic Chicken
Let’s get cooking! Follow these detailed steps for a flawless Creamy Garlic Chicken.
Step 1: Prepare the Chicken
- Pat Dry: Start by patting your boneless, skinless chicken breasts completely dry with paper towels. This is a crucial step that helps achieve a beautiful golden-brown sear. Moisture on the surface of the chicken will steam it rather than sear it.
- Season: Season both sides of the chicken breasts generously with salt, freshly ground black pepper, and if desired, a pinch of garlic powder.
- Prepare for Searing: If your chicken breasts are very thick, you might want to lightly pound them to an even thickness (about ¾ to 1 inch). This ensures they cook more evenly.
Step 2: Sear the Chicken
- Heat Oil: Heat 1 tablespoon of olive oil in a large, heavy-bottomed skillet or Dutch oven over medium-high heat. You want the oil to be shimmering, but not smoking.
- Sear: Carefully place the seasoned chicken breasts in the hot skillet. Do not overcrowd the pan; cook in batches if necessary. Sear for 4-6 minutes per side, or until the chicken is beautifully golden brown and cooked through. The internal temperature should reach 165°F (74°C).
- Remove: Once cooked, remove the chicken from the skillet and transfer it to a plate. Cover loosely with foil to keep warm and allow the juices to redistribute. This resting period is important for tender chicken.
Step 3: Create the Creamy Garlic Sauce
- Melt Butter: Reduce the heat to medium. Add the unsalted butter to the same skillet (don’t clean it – those browned bits at the bottom are full of flavor!). Melt the butter, scraping up any browned bits from the bottom of the pan with a wooden spoon or spatula.
- Sauté Garlic: Add the minced garlic to the melted butter. Sauté for about 1-2 minutes, stirring constantly, until the garlic is fragrant and lightly golden. Be careful not to burn it, as burnt garlic can taste bitter.
- Make a Roux: Sprinkle the all-purpose flour over the sautéed garlic and butter. Stir well to combine, cooking for 1 minute. This creates a roux, which will thicken our sauce.
- Whisk in Broth: Gradually pour in the chicken broth, whisking constantly to prevent lumps. Continue whisking until the sauce starts to thicken and smooth out, about 2-3 minutes.
- Add Cream and Seasonings: Stir in the heavy cream and dried Italian seasoning (or oregano/thyme). Bring the sauce to a gentle simmer, stirring occasionally.
- Adjust Seasoning: Taste the sauce and adjust seasonings as needed. You might want to add a little more salt and pepper, depending on the saltiness of your broth.
Step 4: Combine and Finish
- Return Chicken to Skillet: Once the sauce has thickened to your desired consistency, return the seared chicken breasts (and any accumulated juices from the plate) to the skillet, nestling them into the creamy sauce.
- Simmer: Allow the chicken to simmer in the sauce for an additional 2-3 minutes, just to warm through and allow the flavors to meld beautifully.
- Garnish: Remove from heat and sprinkle generously with fresh chopped parsley just before serving.
Serving Suggestions
This Creamy Garlic Chicken is a complete meal in itself, but it truly shines when paired with the right accompaniments.
- Classic Pairing: Fluffy mashed potatoes are practically mandatory. Their creamy texture and ability to absorb the rich garlic sauce are unparalleled.
- Green Vegetables: Steamed or roasted green beans, asparagus, or broccoli add a pop of color, freshness, and essential nutrients.
- Rice or Pasta: If you’re not a fan of mashed potatoes, serving the chicken and sauce over a bed of white rice, brown rice, or your favorite pasta (like fettuccine or linguine) is equally delicious.
- Crusty Bread: Don’t forget a side of crusty bread to sop up every last drop of that amazing sauce!
Tips for Success
- Don’t Overcook the Chicken: Overcooked chicken can be dry and tough. Use a meat thermometer to ensure it reaches 165°F (74°C) and then remove it promptly.
- Fresh Garlic is Key: While garlic powder is okay for seasoning the chicken, fresh minced garlic is absolutely essential for the sauce’s flavor profile.
- Control Your Heat: When sautéing garlic, keep the heat at medium to prevent it from burning. Burnt garlic will give your sauce a bitter taste.
- Whisk Constantly: When adding the flour and broth for the sauce, whisking continuously will prevent lumps and ensure a smooth, silky sauce.
- Taste and Adjust: Always taste your sauce before serving. You might need to add a little more salt, pepper, or even a squeeze of lemon juice (if you like a hint of acidity) to balance the flavors.
- Rest the Chicken: Allowing the chicken to rest for a few minutes after searing helps the juices redistribute, resulting in more tender and moist meat.
- Don’t Rush the Searing: Give the chicken enough time to develop a nice golden-brown crust. This adds depth of flavor and texture.
Variations and Customizations
While this recipe is perfect as is, feel free to experiment and make it your own!
- Add Mushrooms: Sauté sliced mushrooms (cremini or button) with the garlic for an earthy addition to the sauce.
- Spice It Up: For a touch of heat, add a pinch of red pepper flakes to the sauce along with the Italian seasoning.
- Cheesy Goodness: Stir in a handful of grated Parmesan cheese at the end for an extra layer of savory, cheesy flavor.
- Herbs: Experiment with other fresh herbs like fresh thyme, rosemary, or sage in addition to or instead of parsley. Add them at the end for maximum fresh flavor.
- Chicken Thighs: As mentioned, boneless, skinless chicken thighs work beautifully in this recipe. They tend to stay even moister than breasts. Adjust cooking time as needed.
- Sun-Dried Tomatoes: Stir in a few chopped sun-dried tomatoes (oil-packed, drained) for a burst of sweet-tart flavor and a beautiful color.
Storage and Reheating
Leftover Creamy Garlic Chicken stores well in the refrigerator for 3-4 days in an airtight container.
To reheat, gently warm the chicken and sauce in a skillet over medium-low heat until heated through. You might need to add a splash of chicken broth or a little cream to thin out the sauce if it has become too thick during refrigeration. Avoid reheating at high heat, as this can cause the sauce to separate or the chicken to dry out. This dish is not ideal for freezing as the creamy sauce can sometimes separate upon thawing and reheating.
A Final Word on Flavor
The magic of this Creamy Garlic Chicken truly lies in the balance of flavors and textures. The golden-seared chicken, the tender garlic cloves suspended in the rich, savory sauce, and the subtle herbal notes all come together to create a dish that feels both comforting and luxurious. It’s a testament to how simple, quality ingredients can be transformed into something truly extraordinary with just a little care and attention.
So, whether you’re a seasoned chef or a novice in the kitchen, this recipe is designed for success. It’s an invitation to create, to savor, and to share a meal that speaks of warmth, flavor, and pure deliciousness. We hope you enjoy making (and eating!) this fantastic Creamy Garlic Chicken as much as we do. It’s sure to become a cherished addition to your recipe repertoire. Happy cooking!