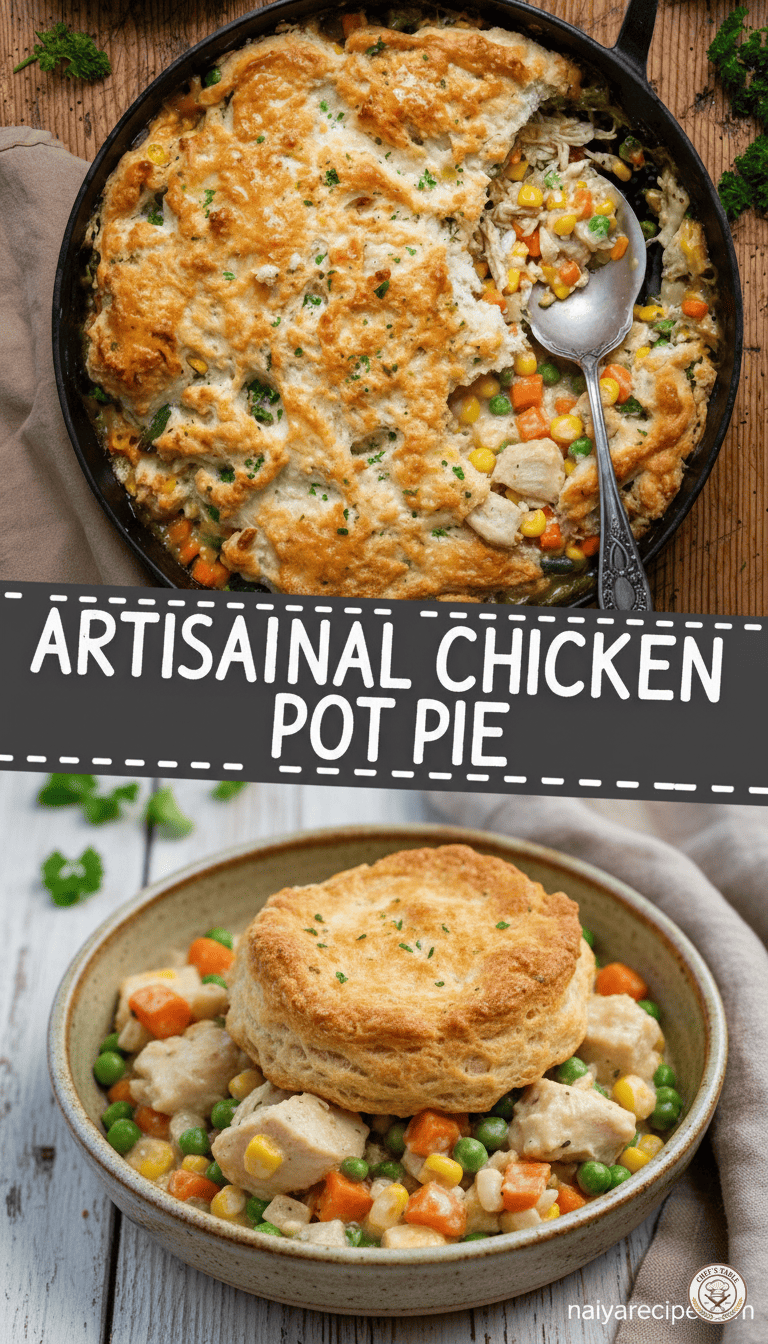
There’s something incredibly comforting about a warm, savory chicken pot pie. It evokes memories of home, family, and hearty meals that fill both the stomach and the soul. While the classic version often brings to mind a flaky, double-crusted pastry, we’re taking a delightful detour today with an artisanal chicken pot pie that features a golden, fluffy biscuit topping. This recipe is designed to be both deeply satisfying and surprisingly approachable, bringing gourmet comfort food right to your kitchen table.
This isn’t just any chicken pot pie; it’s a celebration of textures and flavors. Imagine tender chunks of chicken, perfectly cooked vegetables bathed in a rich, creamy sauce, all crowned with a beautifully baked, golden-brown biscuit. Each spoonful is a harmonious blend of savory goodness and buttery, soft biscuit. It’s the kind of dish that warms you from the inside out, perfect for a cozy evening, a family gathering, or simply when you’re craving something truly special.
The Heart of the Pie: The Filling
The filling is where the magic truly happens. We’re aiming for a robust and flavorful foundation that complements the biscuit topping without being overshadowed by it.
The Chicken:
For the chicken, you have a few excellent options. Pre-cooked rotisserie chicken is a fantastic time-saver, allowing you to get this meal on the table even quicker. Simply shred or dice the meat. If you prefer to cook your own, boneless, skinless chicken breasts or thighs are ideal. Poach them gently in some broth or bake them until cooked through, then dice. The goal is tender, moist chicken that easily integrates into the creamy sauce. Chicken thighs, in particular, offer a bit more richness and tend to stay moist even after cooking.
The Vegetables:
A classic medley of vegetables adds color, texture, and essential nutrients. We’ll be using:
- Carrots: Diced into small, even pieces so they cook through at the same rate as the other vegetables. Carrots add a touch of sweetness and vibrant orange.
- Celery: Provides a subtle, earthy flavor and a bit of crunch. Dice it similarly to the carrots.
- Peas: Frozen peas are perfectly acceptable and convenient. Add them towards the end of the cooking process to retain their bright green color and sweetness.
- Corn: Like peas, frozen corn kernels are a great choice. They add another layer of sweetness and a pleasing pop of texture.
- Onion: A finely diced yellow onion forms the aromatic base of our filling, sautéed until translucent to release its sweet, pungent flavor.
- Potatoes (Optional but Recommended): Small diced potatoes, like Yukon Golds or red potatoes, can add a wonderful heartiness and creamy texture to the filling. If using, make sure they are diced small enough to cook thoroughly within the sauce.
The Creamy Sauce:
The sauce is the luxurious glue that holds everything together. We’ll build a rich, savory gravy that coats every ingredient beautifully.
- Butter: Starting with butter adds a beautiful richness and helps to sauté the aromatics.
- Flour: All-purpose flour is used to create a roux, which thickens the sauce.
- Broth: Chicken broth is the liquid foundation, imparting a deep chicken flavor. Opt for a good quality, low-sodium broth so you can control the seasoning.
- Milk or Cream: For a truly decadent sauce, heavy cream is wonderful. For a slightly lighter but still creamy sauce, whole milk works well. You can also use a combination.
- Seasonings: Salt, freshly ground black pepper, and a touch of dried thyme are essential. Thyme pairs wonderfully with chicken and vegetables in a pot pie. A pinch of poultry seasoning can also enhance the flavor profile.
The Crown Jewel: The Biscuit Topping
What makes this pot pie “artisanal” is the glorious, golden biscuit topping. Forget soggy, store-bought pastry; these biscuits are light, flaky, and absorb all the delicious flavors of the filling below.
Key Ingredients for Perfect Biscuits:
- All-Purpose Flour: The base of our biscuits.
- Baking Powder: Provides the lift, making the biscuits light and fluffy.
- Salt: Balances the flavors.
- Cold Butter: This is crucial! Cold butter, cut into small pieces, creates steam pockets during baking, resulting in those desirable flaky layers. Do not use softened butter.
- Cold Milk or Buttermilk: Cold liquid also helps keep the butter cold. Buttermilk adds a lovely tang and tenderness to biscuits, but regular milk works just fine.
- Optional Enhancements: A pinch of sugar can add a touch of sweetness, and a brush of melted butter or an egg wash on top before baking gives them a beautiful golden sheen.
Step-by-Step Assembly: Crafting Your Masterpiece
Let’s break down the process into manageable steps, ensuring a delicious outcome every time.
1. Prepare the Vegetables:
Dice your carrots, celery, onion, and any potatoes you’re using. If your chicken isn’t pre-cooked, now is the time to cook and shred/dice it.
2. Sauté the Aromatics:
In a large, oven-safe skillet or Dutch oven (one that can go from stovetop to oven), melt the butter over medium heat. Add the diced onions, carrots, and celery. Cook, stirring occasionally, until the vegetables begin to soften, about 5-7 minutes. If using potatoes, add them now and cook for a few more minutes.
3. Build the Roux:
Sprinkle the flour over the softened vegetables. Cook, stirring constantly, for 1-2 minutes. This cooks out the raw flour taste.
4. Create the Creamy Base:
Gradually whisk in the chicken broth, making sure to scrape up any bits from the bottom of the pan. Continue whisking until the mixture thickens slightly. Then, slowly whisk in the milk or cream. Bring the mixture to a gentle simmer, stirring occasionally. The sauce should be thick enough to coat the back of a spoon.
5. Add the Chicken and Remaining Vegetables:
Stir in the cooked chicken, frozen peas, and frozen corn. Season generously with salt, pepper, and dried thyme. Taste and adjust seasonings as needed. The filling should be well-seasoned, as the biscuit topping will be relatively plain. Remove the skillet from the heat.
6. Prepare the Biscuit Topping:
In a large bowl, whisk together the flour, baking powder, and salt. Cut the cold butter into small cubes or grate it directly into the flour mixture. Using your fingertips, a pastry blender, or two knives, cut the butter into the flour until the mixture resembles coarse crumbs with some pea-sized pieces of butter remaining.
7. Form the Biscuit Dough:
Gradually add the cold milk or buttermilk, stirring with a fork until a shaggy dough forms. Be careful not to overmix; overworking the dough develops gluten, which can lead to tough biscuits.
8. Shape and Place the Biscuits:
Turn the dough out onto a lightly floured surface. Gently knead it a few times, just enough to bring it together. You can either roll the dough out to about 1/2-inch thickness and use a biscuit cutter to create individual biscuits, or simply drop spoonfuls of the dough directly onto the hot chicken filling. If using a cutter, arrange the biscuits on top of the filling, leaving a little space between them for expansion.
9. Bake to Golden Perfection:
Place the skillet in a preheated oven (around 375°F or 190°C). Bake for 25-35 minutes, or until the biscuit topping is golden brown and cooked through, and the filling is bubbly and heated thoroughly. If the biscuits are browning too quickly, you can loosely tent the skillet with foil.
10. Rest and Serve:
Once baked, remove the pot pie from the oven and let it rest for 5-10 minutes before serving. This allows the sauce to set slightly and prevents you from burning your mouth! Garnish with fresh parsley if desired.
Tips for Success
- Don’t Overmix the Biscuits: This is the most important rule for tender biscuits. Mix just until combined.
- Cold Ingredients are Key for Biscuits: Keep your butter and milk as cold as possible. You can even cube your butter and put it in the freezer for 10-15 minutes before using.
- Adjust Thickness of Filling: If your sauce seems too thick, you can thin it with a little more broth or milk. If it’s too thin, you can continue to simmer it gently to reduce, or make a quick slurry of a tablespoon of cornstarch mixed with an equal amount of cold water and whisk it into the simmering sauce.
- Season Generously: Taste the filling before adding the biscuits. A well-seasoned filling makes all the difference.
- Make Ahead: You can prepare the chicken filling a day in advance and store it in the refrigerator. When ready to bake, reheat the filling gently, then prepare the biscuit dough and proceed with baking.
- Variety of Vegetables: Feel free to customize the vegetables based on what you have on hand or what you enjoy. Green beans, mushrooms, or even some spinach could be wonderful additions.
- Consider Your Skillet: An oven-safe cast iron skillet is perfect for this recipe as it distributes heat beautifully and retains it well. If you don’t have one, you can transfer the filling to a baking dish before adding the biscuit topping.
Why This Artisanal Version Shines
This artisanal chicken pot pie with a biscuit topping offers a delightful alternative to traditional recipes. The biscuits provide a lighter, more yielding texture compared to a heavier pastry crust, making each bite incredibly satisfying without feeling overly rich. The golden, slightly crisp exterior of the biscuit gives way to a soft, fluffy interior that is perfect for soaking up the creamy chicken and vegetable filling.
It’s a meal that speaks to the soul, comforting and deeply flavorful, yet with an elevated touch that makes it feel special. Whether you’re feeding a crowd or simply enjoying a quiet meal at home, this artisanal chicken pot pie is sure to become a cherished addition to your recipe repertoire. Enjoy the process of creating this beautiful and delicious dish, and savor every single bite!